If you want to migrate your Ionic app to Capacitor 3, there’s a few things you need to take care of in order to enjoy the benefits of the best Capacitor version yet.
In this Quick Win we will run though all the necessary steps and hints at potential breaking elements that you need need to take care of in your app.
Since I expect you to have an existing Ionic application with Capacitor 2, we’re not starting a new one and simply go through each step to update your apps code and the native iOS and Android platform!
The full quick win with snippets is only available to Ionic Academy members.
Join now for
- Unlimited access to all quick wins
- Library of 40+ step-by-step video courses
- Support for Ionic questions via Slack & private community
Update your Dependencies
First of all we need to update the Capacitor core and CLI version in our project, so go ahead and run:
|
1 2 3 4 |
npm install @capacitor/cli@latest @capacitor/core@latest # Update Typescript npm i typescript@~4 |
You can use Typescript 3.8+, I just added 4 as it’s currently the latest but be careful: Your Angular version might not support Typescript 4, in that case stick to something like 3.9.x!
Use the new Capacitor TS Config
The next step is completely optional but I still recommend it. By default, the configuration for our Capacitor project has been a JSON file, which made it easy to introduce bugs into it and it made it hard to change it for specific environments.
With Capacitor 3, we can change this to a TS file and use the CapacitorConfig interface instead, so create a capacitor.config.ts at the root and insert:
|
1 2 3 4 5 6 7 8 9 10 11 12 13 14 |
import { CapacitorConfig } from '@capacitor/cli'; const config: CapacitorConfig = { appId: 'io.ionic.starter', appName: 'photoBook', webDir: 'www', plugins: { SplashScreen: { launchShowDuration: 0, } }, }; export default config; |
This is just an example from my project, make sure to use your app information and bring in all the other keys that you might have already added to your previous JSON configuration.
Once you are done, you can safely remove your old JSON configuration from the project.
Update Your Plugin Imports
With Capacitor 3, all plugins that came previously “batteries included” with the core are now within their own npm package.
That means, you need to go through you app and spot all the old imports like this:
|
1 2 3 4 5 6 |
import { Plugins, CameraResultType, Capacitor, FilesystemDirectory, CameraPhoto } from '@capacitor/core'; const { Camera, Filesystem, Storage } = Plugins; |
Instead of destructuring the plugins object, each of those APIs need to be installed separately. For the above example it would require an installation like this now:
|
1 |
npm i @capacitor/camera @capacitor/filesystem @capacitor/storage |
Now we can import each of those objects from their own package instead:
|
1 2 3 4 |
import { Capacitor } from '@capacitor/core'; import { Camera, CameraResultType, CameraPhoto } from '@capacitor/camera'; import { Filesystem, FilesystemDirectory } from '@capacitor/filesystem'; import { Storage } from '@capacitor/storage'; |
If you happen to use any of those plugins (or maybe also for others) you might get a deprecation warning as the interface for some types has changed. To finish that migration, we can use the new interfaces for Photo or Directory instead now:
|
1 2 |
import { Camera, CameraResultType, Photo } from '@capacitor/camera'; import { Filesystem, Directory } from '@capacitor/filesystem'; |
You can see all the plugins inside the docs and also an overview within a Github issue about the changes!
Go through your app and fix this in all the places where you previously used the old syntax and imports.
Storage Migration
Additional attention needs the Storage plugin, which was changed under the hood and needs to migrate the data.
If your app is using Capacitor Storage, make sure to add a migration call at some early point in your application:
|
1 |
Storage.migrate(); |
Maybe set an additional key to some storage and check it at that point so your app is not running this migration over and over again, although it shouldn’t destroy any of your existing data!
iOS Migration
Now we get into the native platforms, for which the migration is a bit challenging. First of all, make your your CocoaPods version is above 1.8 by running:
|
1 |
pod --version |
If that’s not the case, you should update your global CocoaPods installation now!
Build Settings
For the next step we need to open the Xcode project and dive into the Build Settings tab of our target. First step is to change the iOS Deployment Target to iOS 12.0.
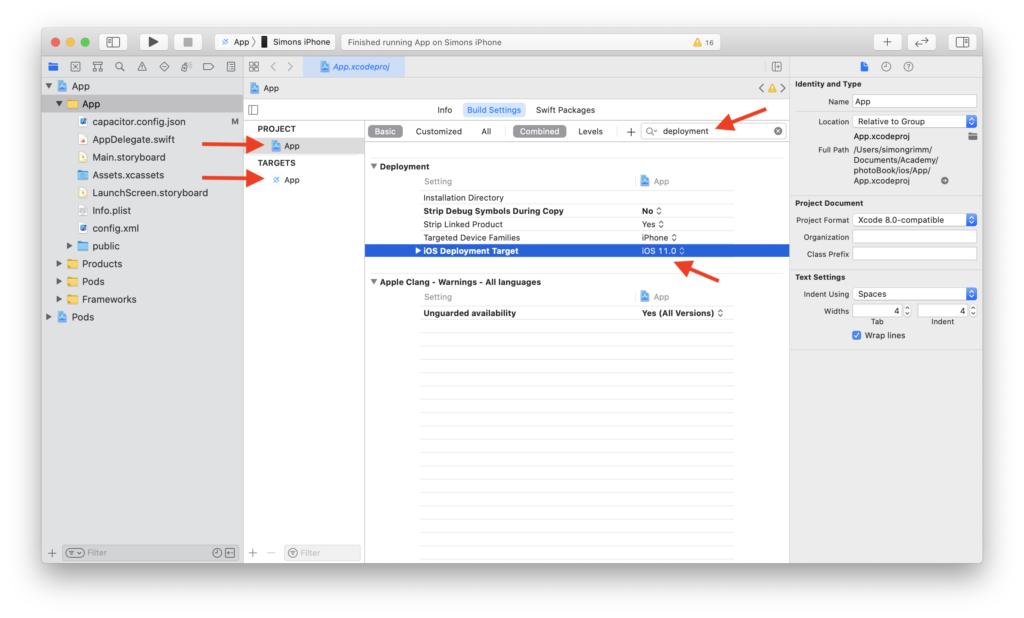
Make sure to perform this for both the target and your app as seen in the image above.
The same update needs to happen inside the ios/App/Podfile, and because I could only select 12.1 in the previous step I also used this value now:
|
1 2 |
#platform :ios, '11.0' platform :ios, '12.1' |
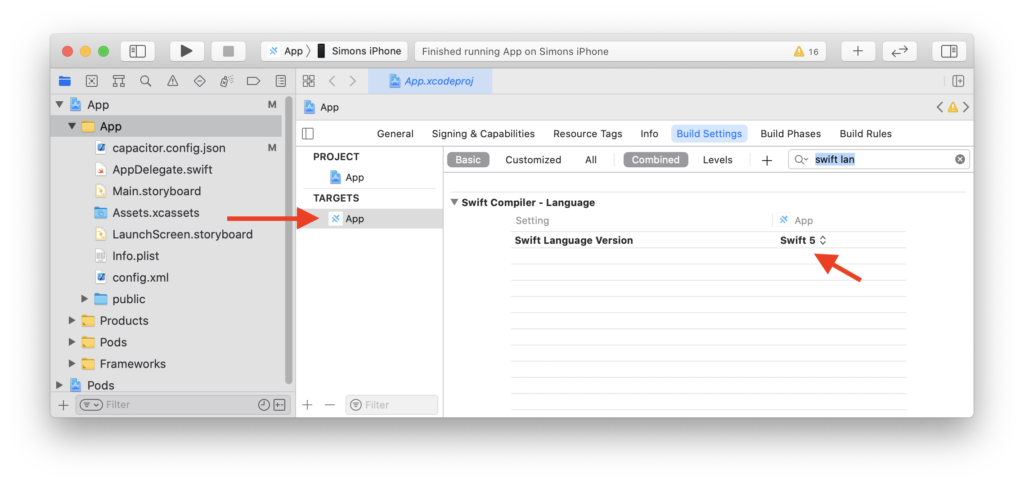
After that, we also need to change the Swift Language version of the target to version 5, but in my project that was already the case:
Directory Structure
Now we need to change the structure of the directories since Capacitor 3 wants to sync our app files to a different location.
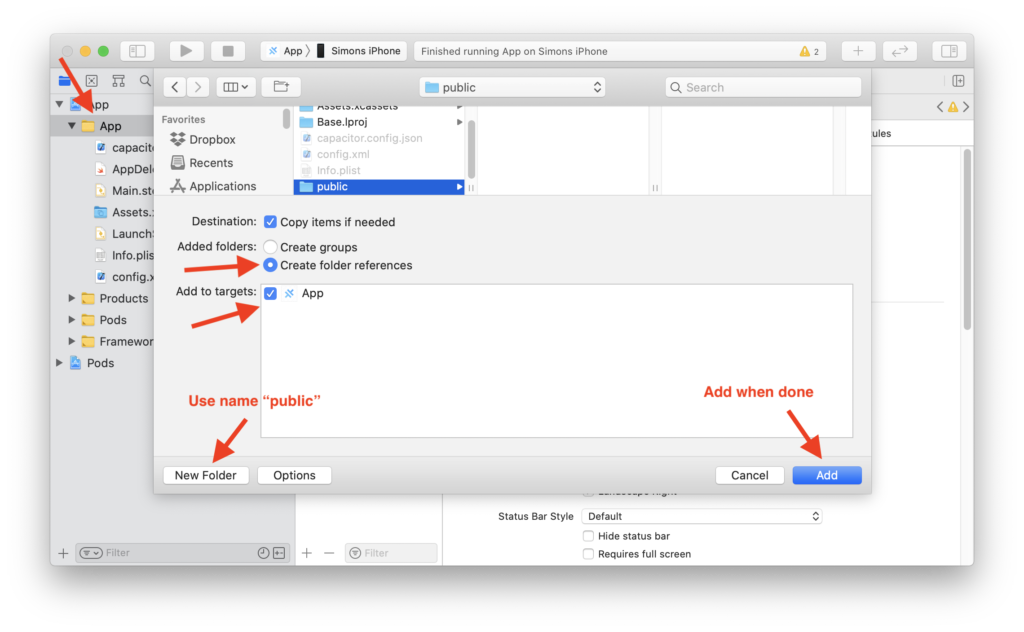
Therefore, delete the public folder from your file tree and select move to Trash to get rid of it completely.
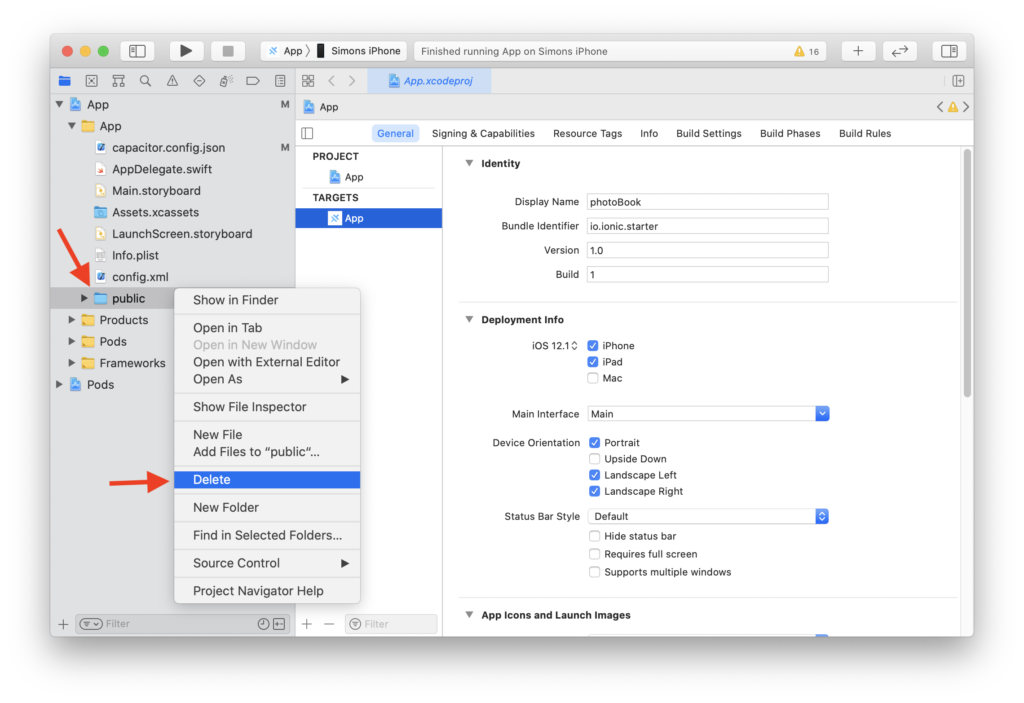
Now we need to recreate it in a different place, so we right click on our app folder and select Add files to “App”…, leave all settings as they are like in the image below and create a new folder with the name “public”, then hit Add and the folder will created in the right place!
Since the folder is at a new place, we need to update the ios/.gitignore to ignore the folder at the new location now, plus a DerivedData folder that is used by Capacitor now:
|
1 2 3 |
#App/public App/App/public DerivedData |
Ok that’s it for the ugly changes, now on to some code.
Update iOS Platform
We can now finally update the iOS platform by running:
|
1 2 |
npm install @capacitor/ios@latest npx cap sync ios |
But we are not yet there…
Swift Changes
The last thing we need to change is inside the ios/App/App/AppDelegate.swift where we need to replace references to CAPBridge and replace a few lines, so go ahead with the first two functions:
|
1 2 3 4 5 6 7 8 9 10 11 |
func application(_ app: UIApplication, open url: URL, options: [UIApplication.OpenURLOptionsKey : Any] = [:]) -> Bool { // Called when the app was launched with a url. Feel free to add additional processing here, // DEPRECATED return CAPBridge.handleOpenUrl(url, options) return ApplicationDelegateProxy.shared.application(app, open: url, options: options) } func application(_ application: UIApplication, continue userActivity: NSUserActivity, restorationHandler: @escaping ([UIUserActivityRestoring]?) -> Void) -> Bool { // Called when the app was launched with an activity, including Universal Links. // DEPRECATED return CAPBridge.handleContinueActivity(userActivity, restorationHandler) return ApplicationDelegateProxy.shared.application(application, continue: userActivity, restorationHandler: restorationHandler) } |
On top of that we can scroll down the ios/App/App/AppDelegate.swift a bit more and replace three more lines like this:
|
1 2 3 4 5 6 7 8 9 10 11 12 13 14 15 16 17 18 19 20 21 22 23 |
override func touchesBegan(_ touches: Set<UITouch>, with event: UIEvent?) { super.touchesBegan(touches, with: event) let statusBarRect = UIApplication.shared.statusBarFrame guard let touchPoint = event?.allTouches?.first?.location(in: self.window) else { return } if statusBarRect.contains(touchPoint) { // DEPRECATED NotificationCenter.default.post(CAPBridge.statusBarTappedNotification) NotificationCenter.default.post(name: .capacitorStatusBarTapped, object: nil) } } #if USE_PUSH func application(_ application: UIApplication, didRegisterForRemoteNotificationsWithDeviceToken deviceToken: Data) { // DEPRECATED NotificationCenter.default.post(name: Notification.Name(CAPNotifications.DidRegisterForRemoteNotificationsWithDeviceToken.name()), object: deviceToken) NotificationCenter.default.post(name: .capacitorDidRegisterForRemoteNotifications, object: deviceToken) } func application(_ application: UIApplication, didFailToRegisterForRemoteNotificationsWithError error: Error) { // DEPRECATED NotificationCenter.default.post(name: Notification.Name(CAPNotifications.DidFailToRegisterForRemoteNotificationsWithError.name()), object: error) NotificationCenter.default.post(name: .capacitorDidFailToRegisterForRemoteNotifications, object: error) } |
And voila – build your app, maybe clean your Xcode project but your Ionic app should now work with Capacitor 3 for iOS!
Android Migration
The Android migration is a bit easier since we only need to change a few files and lines, partly even optional.
Update Android Platform
First of all we need to install the latest Android platform and sync our project changes:
|
1 2 |
npm install @capacitor/android@latest npx cap sync android |
You could now also update your MainActivity since Capacitor 3 should automatically include all plugins in there unlike before where you manually added an entry for every community plugin.
At this early point I’m not sure if this will automatically work with Community plugins if they haven’t been updated for Capacitor 3, so be a bit cautious with this step as the entries might still be required while they are not updated yet.
Update Gradle
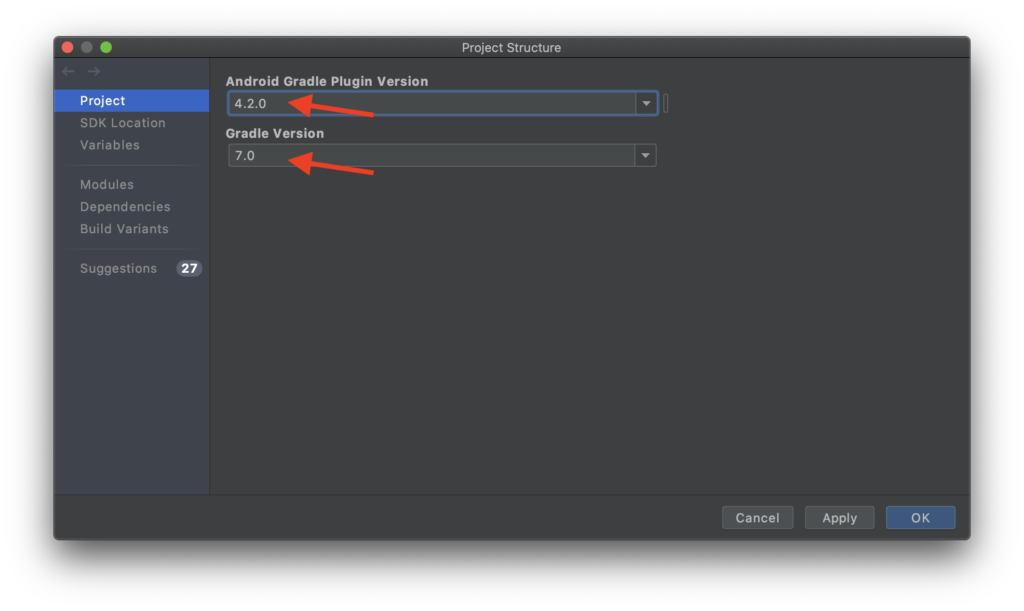
With Capacitor 3 Gradle 7.0 is recommended, so we can update it within Android Studio by clicking on File -> Project Structure and set Gradle to 7.0 and Android Gradle Plugin Version to 4.2.0.
On top of that we should update our values inside the android/variables.gradle like this:
|
1 2 3 4 5 6 7 8 9 10 11 12 13 14 15 |
ext { minSdkVersion = 21 compileSdkVersion = 30 targetSdkVersion = 30 androidxActivityVersion = '1.2.0' androidxAppCompatVersion = '1.2.0' androidxCoordinatorLayoutVersion = '1.1.0' androidxCoreVersion = '1.3.2' androidxFragmentVersion = '1.3.0' androidxMaterialVersion = '1.3.0-rc01' junitVersion = '4.13.1' androidxJunitVersion = '1.1.2' androidxEspressoCoreVersion = '3.3.0' cordovaAndroidVersion = '7.0.0' } |
You can find more information on each variable inside the migration guide.
Remove Permissions
By default, Capacitor included a lot of permissions although your app might not even need them. You can now remove them safely and only add those necessary if it’s stated on a plugin.
Therefore open the android/app/src/main/AndroidManifest.xml and only leave what’s needed, in my app I was using the file system and camera:
|
1 2 3 4 5 6 7 8 9 10 11 12 13 14 15 16 |
<uses-permission android:name="android.permission.INTERNET" /> <!-- Camera, Photos, input file --> <uses-permission android:name="android.permission.READ_EXTERNAL_STORAGE"/> <uses-permission android:name="android.permission.WRITE_EXTERNAL_STORAGE" /> <!-- Geolocation API --> <!-- <uses-permission android:name="android.permission.ACCESS_COARSE_LOCATION" /> <uses-permission android:name="android.permission.ACCESS_FINE_LOCATION" /> <uses-feature android:name="android.hardware.location.gps" /> --> <!-- Network API --> <!-- <uses-permission android:name="android.permission.ACCESS_NETWORK_STATE" /> --> <!-- Navigator.getUserMedia --> <!-- Video --> <uses-permission android:name="android.permission.CAMERA" /> <!-- Audio --> <!-- <uses-permission android:name="android.permission.RECORD_AUDIO" /> <uses-permission android:name="android.permission.MODIFY_AUDIO_SETTINGS"/> --> |
Some plugins will also automatically add their permissions in here in the future, but always check the plugins you use for more information about that.
With that finished, you might have to clean your project once but your app should run fine with Capacitor 3 on Android!
Conclusion
The migration to Capacitor 3 isn’t too hard, but also a bit tricky especially in terms of the changes required for native platforms.
Hopefully future migrations will be easier which should be the case since now Capacitor core contains really only the core APIs and all other plugins can be maintained in their respective package.
You can also find a video version of this Quick Win below.