Many times you want to notify your users about events, but perhaps it is not worth implementing real push notifications. For those cases we can easily make use of local notifications, which look completely like a push notification but the way to implement them is a lot shorter.
In this quick win we will add the local notifications plugin from Ionic Native to our app and learn to schedule a notification, send data along with it and finally listen for a callback to know when our notification was shown to the user or other events happened.
Adding Local Notifcations to Your App
When I used the plugin I had problems with iOS 10 as there was an update to how notifications on iOS work in general. Therefore, I installed a specific branch of the Cordova plugin which will soon be hopefully merged into the master. If you want to get it working on iOS as well make sure to install it like this:
|
1 2 3 4 5 |
npm install --save @ionic-native/local-notifications ionic plugin add https://github.com/katzer/cordova-plugin-local-notifications\#ios10 # If you encounter problems, install latest core package npm install --save @ionic-native/core@latest |
Also, I sometimes had problems with the current core package of Ionic Native, so if you hit an error perhaps installing the latest version fixes your problems.
Finally make sure to load the plugin inside your src/app/app.module.ts and add it to the array of providers like this:
|
1 2 3 4 5 6 7 |
import { LocalNotifications } from '@ionic-native/local-notifications'; ... ... providers: [ LocalNotifications , .. ] |
The basics are ready, noe we can actually use them!
Creating Local Notifications
Inside your page you first of all need to import the package, and you also need from Ionic the Platform and AlertController which will help us to catch events and present an alert.
So at the top make sure you have loaded these:
|
1 2 |
import { NavController, AlertController, Platform } from 'ionic-angular'; import { LocalNotifications } from '@ionic-native/local-notifications'; |
Now, when we want to use local notifications we need to schedule them.
To schedule them we need to pass in a few parameters like an ID by which we could find the notification later, a title, a text and of course a date when the notification should be presented, even when the app is in the background.
Besides that information we can also pass an object as data to the notification which we can then use inside our callback!
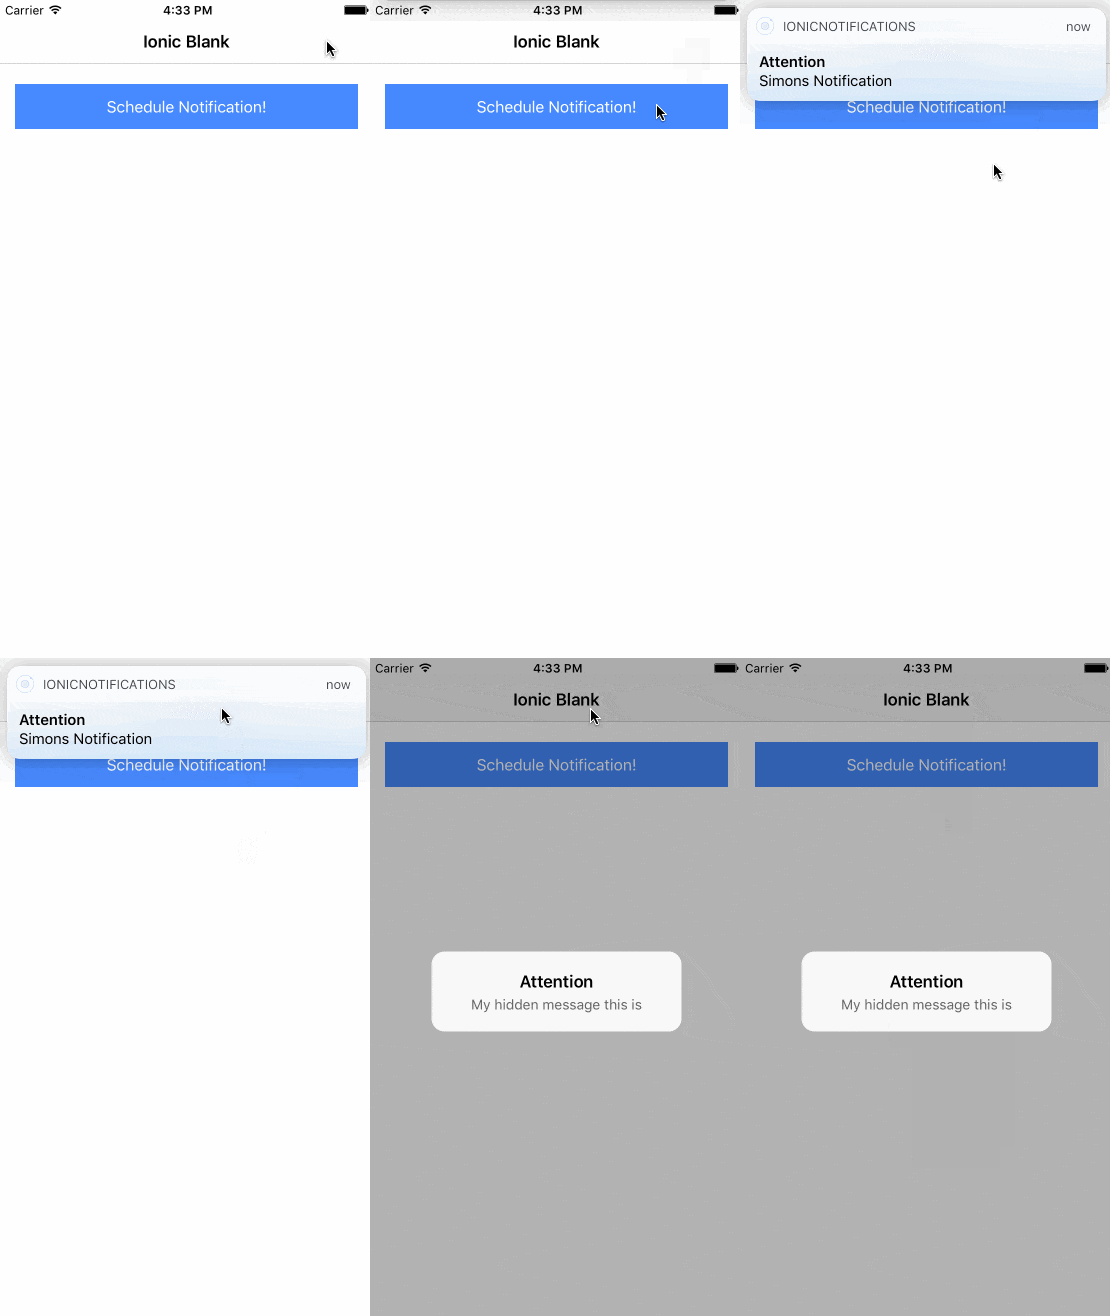
The callback is implemented inside the constructor, and means: Whenever someone clicks on the notification which comes up at the top of the device, this function will be called.
We also have to wrap it into the platform ready event because otherwise this callback might not be assigned correctly and get’s never triggered (I had this problem until I realized what was wrong).
In our example, we will show an alert view inside the app when the user has clicked on the notification. Now go ahead and add to the page where you want to implement local notifications something like this:
|
1 2 3 4 5 6 7 8 9 10 11 12 13 |
constructor(public navCtrl: NavController, private plt: Platform, private localNotifications: LocalNotifications, alertCtrl: AlertController) { this.plt.ready().then((readySource) => { this.localNotifications.on('click', (notification, state) => { let json = JSON.parse(notification.data); let alert = alertCtrl.create({ title: notification.title, subTitle: json.mydata }); alert.present(); }) }); } |
|
1 2 3 4 5 6 7 8 9 |
scheduleNotification() { this.localNotifications.schedule({ id: 1, title: 'Attention', text: 'Simons Notification', data: { mydata: 'My hidden message this is' }, at: new Date(new Date().getTime() + 5 * 1000) }); } |
Inside you view simply add an additional button to call the scheduleNotification() function and give it a try!
This will not work inside the browser, so you need a simulator or physical device to test it.
The result might look like below.

You might have noticed that we display data inside our alter view that was passed in the beginning as data object This object comes into our callback and we simply parse the data back to JSON and use the initial property mydata again there!
By doing this you can easily put specific information into the notification which you can then use inside the callback to bring the user to a specific page or call a specific function depending on what you passed!
More..
There is a lot more you could do, like update or cancel a notification by it’s given id or pass more information like a sound and image to the notification. To check out all options, simply follow the instructions on the official Github repository!
You can find a video version of this article below.

Thanks for a nice article. Have you tried using this in the background service? For instance app is regularly retrieving stock price from the web service in the background and if the price falls under 100USD it creates the local notification. Is it possible to achieve that even if the app is not running (user manually closed it)?
Thank you !!
I got problems while building app. This is the message: ” [00:19:46] lint finished in 2.58 s
Failed to restore plugin “cordova-plugin-statusbar” from config.xml. You might need
to try adding it again. Error: Failed to fetch plugin cordova-plugin-statusbar@https
://github.com/apache/cordova-plugin-statusbar.git via registry.
Probably this is either a connection problem, or plugin spec is incorrect.
Check your connection and plugin name/version/URL.
Error: cmd: Command failed with exit code 1 Error output:
npm WARN addRemoteGit Error: not found: git
npm WARN addRemoteGit at getNotFoundError (C:Program Filesnodejsnode_modules
npmnode_moduleswhichwhich.js:14:12)
npm WARN addRemoteGit at F (C:Program Filesnodejsnode_modulesnpmnode_module
swhichwhich.js:69:19)
npm WARN addRemoteGit at E (C:Program Filesnodejsnode_modulesnpmnode_module
swhichwhich.js:81:29)
npm WARN addRemoteGit at C:Program Filesnodejsnode_modulesnpmnode_modulesw
hichwhich.js:90:16
npm WARN addRemoteGit at C:Program Filesnodejsnode_modulesnpmnode_modulesw
hichnode_modulesisexeindex.js:44:5
npm WARN addRemoteGit at C:Program Filesnodejsnode_modulesnpmnode_modulesw
hichnode_modulesisexewindows.js:29:5
npm WARN addRemoteGit at C:Program Filesnodejsnode_modulesnpmnode_modulesg
raceful-fspolyfills.js:264:29
npm WARN addRemoteGit at FSReqWrap.oncomplete (fs.js:123:15)
npm WARN addRemoteGit git+https://github.com/apache/cordova-plugin-statusbar.git re
setting remote C:UsersquendAppDataRoamingnpm-cache_git-remotesgit-https-githu
b-com-apache-cordova-plugin-statusbar-git-c66a3d92 because of error: { Error: not fo
und: git
npm WARN addRemoteGit at getNotFoundError (C:Program Filesnodejsnode_modules
npmnode_moduleswhichwhich.js:14:12)
npm WARN addRemoteGit at F (C:Program Filesnodejsnode_modulesnpmnode_module
swhichwhich.js:69:19)
npm WARN addRemoteGit at E (C:Program Filesnodejsnode_modulesnpmnode_module
swhichwhich.js:81:29)
npm WARN addRemoteGit at C:Program Filesnodejsnode_modulesnpmnode_modulesw
hichwhich.js:90:16
npm WARN addRemoteGit at C:Program Filesnodejsnode_modulesnpmnode_modulesw
hichnode_modulesisexeindex.js:44:5
npm WARN addRemoteGit at C:Program Filesnodejsnode_modulesnpmnode_modulesw
hichnode_modulesisexewindows.js:29:5
npm WARN addRemoteGit at C:Program Filesnodejsnode_modulesnpmnode_modulesg
raceful-fspolyfills.js:264:29
npm WARN addRemoteGit at FSReqWrap.oncomplete (fs.js:123:15) code: ‘ENOGIT’ }
npm ERR! git clone –template=C:UsersquendAppDataRoamingnpm-cache_git-remotes
_templates –mirror https://github.com/apache/cordova-plugin-statusbar.git C:Users
quendAppDataRoamingnpm-cache_git-remotesgit-https-github-com-apache-cordova-plu
gin-statusbar-git-c66a3d92: undefined
npm ERR! git clone –template=C:UsersquendAppDataRoamingnpm-cache_git-remotes
_templates –mirror https://github.com/apache/cordova-plugin-statusbar.git C:Users
quendAppDataRoamingnpm-cache_git-remotesgit-https-github-com-apache-cordova-plu
gin-statusbar-git-c66a3d92: undefined
npm ERR! Windows_NT 10.0.15063
npm ERR! argv “C:\Program Files\nodejs\node.exe” “C:\Program Files\nodejs\node
_modules\npm\bin\npm-cli.js” “install” “cordova-plugin-statusbar@https://github.c
om/apache/cordova-plugin-statusbar.git”
npm ERR! node v6.11.0
npm ERR! npm v3.10.10
npm ERR! code ENOGIT
npm ERR! not found: git
npm ERR!
npm ERR! Failed using git.
npm ERR! This is most likely not a problem with npm itself.
npm ERR! Please check if you have git installed and in your PATH.
npm ERR! Please include the following file with any support request:
npm ERR! C:UsersquendDesktopionicnotificacionesnode_modulesnpm-debug.log”
Perfect. One Question. How I save the notification in the locastore in other page?
How can I receive notifications constantly in background state ?
Is there an answer to receive notifications constantly in background state ?
Is there an answer to receive notifications constantly in background state? I am unable to find any answer.
it’s not worked on Android, Why?
It works , check the plugin and other stuffs that might have not been yet installed
[15:34:51] transpile started …
[15:35:10] typescript: D:/ionic/myApp1/src/pages/home/home.ts, line: 13
Expected 1 arguments, but got 2.
L12: this.platform.ready().then(() => {
L13: this.localNoti.on(‘click’, (noti, state) => {
L14: alert(state);
Error: Failed to transpile program
at new BuildError (D:ionicmyApp1node_modules@ionicapp-scriptsdistutil
errors.js:16:28)
at D:ionicmyApp1node_modules@ionicapp-scriptsdisttranspile.js:159:20
at new Promise ()
at transpileWorker (D:ionicmyApp1node_modules@ionicapp-scriptsdisttra
nspile.js:107:12)
at Object.transpile (D:ionicmyApp1node_modules@ionicapp-scriptsdisttr
anspile.js:64:12)
at D:ionicmyApp1node_modules@ionicapp-scriptsdistbuild.js:109:82
at
Hmm this tutorial doesn’t work anymore, at least for me on Android. Any idea why? First the build for Android failed, which I was able to fix by installing
cordova-android-support-gradle-release. But now the the button does not trigger any notification :/ Any idea why?