
Adding filters to your images inside an Ionic app can be challenging as the calculations are not really trivial. Therefore, using an external package so you don’t have to reeivent the wheel makes sense, and if this package is a Stencil component itself you’ve found your new best friend.
In this quick win we will use the web photo filter which uses WebGL filters under the hood. That means, applying cool Instagram like filters to your images is both blazing fast and will work even inside your Ionic PWA as it’s based on web technologies!
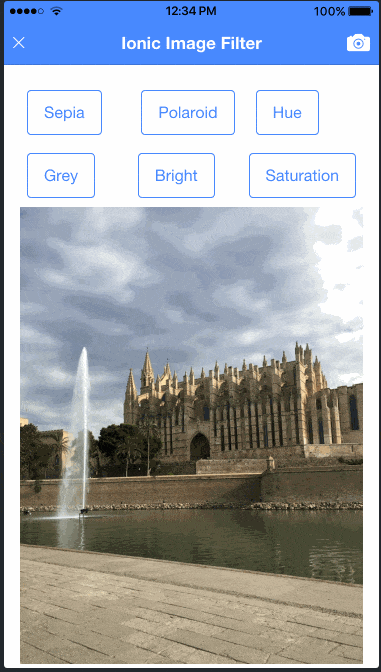
That’s what our result will look like, and it’s not even using all the cool options. For everything including examples check out the showcase for this package!
Setting Up the Ionic Image Filter App
To get started we bring up a blank Ionic app and install both the web-photo-filter package and the Ionic Camera plugin so you can actually capture new images as well. Go ahead and run:
|
1 2 3 |
ionic start imageFilter blank npm install web-photo-filter @ionic-native/camera ionic cordova plugin add cordova-plugin-camera |
To make use of the package we need to make some minor changes to our build process in order to include this web component correctly. First, add a block to your package.json in which you define a custom ionic_copy script that we’ll add soon:
|
1 2 3 |
"config": { "ionic_copy": "./config/copy.config.js" }, |
Next, create the folder and new file at config/copy.config.js and insert everything from the regular Ionic copy script plus a block which copies over the component:
|
1 2 3 4 5 6 7 8 9 10 11 12 13 14 15 16 17 18 19 20 21 22 23 24 25 26 |
module.exports = { copyAssets: { src: ['{{SRC}}/assets/**/*'], dest: '{{WWW}}/assets' }, copyIndexContent: { src: ['{{SRC}}/index.html', '{{SRC}}/manifest.json', '{{SRC}}/service-worker.js'], dest: '{{WWW}}' }, copyFonts: { src: ['{{ROOT}}/node_modules/ionicons/dist/fonts/**/*', '{{ROOT}}/node_modules/ionic-angular/fonts/**/*'], dest: '{{WWW}}/assets/fonts' }, copyPolyfills: { src: [`{{ROOT}}/node_modules/ionic-angular/polyfills/${process.env.IONIC_POLYFILL_FILE_NAME}`], dest: '{{BUILD}}' }, copySwToolbox: { src: ['{{ROOT}}/node_modules/sw-toolbox/sw-toolbox.js'], dest: '{{BUILD}}' }, copyWebPhotoFilter: { src: ['{{ROOT}}/node_modules/web-photo-filter/dist/webphotofilter**/*'], dest: '{{BUILD}}' } } |
Finally we need to load the component into our module plus the previously installed Ionic Camera plugin. To make use of our web component we also need to add the schemas entry with the CUSTOM_ELEMENTS_SCHEMA so our app knows about the custom component upfront and handles it correctly during the build.
Go ahead and change your app/app.module.ts to this:
|
1 2 3 4 5 6 7 8 9 10 11 12 13 14 15 16 17 18 19 20 21 22 23 24 25 26 27 28 29 30 31 32 33 34 35 |
import { BrowserModule } from '@angular/platform-browser'; import { ErrorHandler, NgModule, CUSTOM_ELEMENTS_SCHEMA } from '@angular/core'; import { IonicApp, IonicErrorHandler, IonicModule } from 'ionic-angular'; import { SplashScreen } from '@ionic-native/splash-screen'; import { StatusBar } from '@ionic-native/status-bar'; import { MyApp } from './app.component'; import { HomePage } from '../pages/home/home'; import 'web-photo-filter'; import { Camera } from '@ionic-native/camera'; @NgModule({ declarations: [ MyApp, HomePage ], imports: [ BrowserModule, IonicModule.forRoot(MyApp) ], bootstrap: [IonicApp], entryComponents: [ MyApp, HomePage ], providers: [ StatusBar, SplashScreen, {provide: ErrorHandler, useClass: IonicErrorHandler}, Camera ], schemas: [CUSTOM_ELEMENTS_SCHEMA] }) export class AppModule {} |
Note: If you develop your app for iOS you need to include the right permissions for the camera or photo library, and the easiest way to automatically add them is by adding these lines to your config.xml:
|
1 2 3 4 5 6 |
<edit-config file="*-Info.plist" mode="merge" target="NSCameraUsageDescription"> <string>need camera access to take pictures</string> </edit-config> <edit-config file="*-Info.plist" mode="merge" target="NSPhotoLibraryUsageDescription"> <string>need photo library access to get pictures from there</string> </edit-config> |
Now the iOS project will be build with the additional entries to the plist and Apple won’t complain. Of course make sure to add useful information why you are using the plugins instead of the standard string!
Adding the Ionic Image Filter Effects
We’ve set up everything (hopefully) so it’s time to build our actual app. First of all we create the logic, which is actually pretty small.
Our class holds a reference to the image which could either be a local file (good for testing right now) or the result of a call to the camera.
Once we got an image we apply an initial filter which basically sets everything back to start, so no filter will be applied in the beginning. This filter will change the level and predefined filter of our component, but we don’t have to add any more logic to see the filter in action!
Also, whenever a filter was applied the imageLoaded() function will be called. This function now has access to the underlying Canvas element therefore we grab a reference to it and store it.
Later we could use this result inside our saveImage() which you would call if the user is done editing the image. I’ve left the saving open as exercise for the reader, but you could also combine this with the approach of the previous CropperJS quick win to allow even more customization of the images!
For now, open your pages/home/home.ts and change it to:
|
1 2 3 4 5 6 7 8 9 10 11 12 13 14 15 16 17 18 19 20 21 22 23 24 25 26 27 28 29 30 31 32 33 34 35 36 37 38 39 40 41 42 43 44 45 46 47 48 49 50 51 52 53 54 55 56 57 58 |
import { Component } from '@angular/core'; import { NavController } from 'ionic-angular'; import { Camera, CameraOptions } from '@ionic-native/camera'; @Component({ selector: 'page-home', templateUrl: 'home.html' }) export class HomePage { selectedFilter = null; image = ''; level = 1; result: HTMLElement; constructor(public navCtrl: NavController, private camera: Camera) { } imageLoaded(e) { // Grab a reference to the canvas/image this.result = e.detail.result; } captureImage() { // Use with a local asset for testing // this.image = 'assets/imgs/mallorca.jpg'; // this.filter(null, 1); // Real usage with Camera const options: CameraOptions = { quality: 100, destinationType: this.camera.DestinationType.DATA_URL, encodingType: this.camera.EncodingType.JPEG, mediaType: this.camera.MediaType.PICTURE, sourceType: this.camera.PictureSourceType.CAMERA, correctOrientation: true } this.camera.getPicture(options).then((imageData) => { this.image = 'data:image/jpeg;base64,' + imageData; this.filter(null, 1); }); } filter(selected, level?) { this.selectedFilter = selected; this.level = level ? level : 1; } saveImage() { if (!this.selectedFilter) { // Use the original image! } else { let canvas = this.result as HTMLCanvasElement; // export as dataUrl or Blob! let base64 = canvas.toDataURL('image/jpeg', 1.0); // Do whatever you want with the result! } } } |
As you can see, we don’t have to do a lot to apply a filter, we just need to make sure the component inside our view has access to the right values and the filter will be applied magically!
Therefore, let’s finish this with the actual view of our Ionic image filter app.
We need a few buttons to either capture an image (or set the local image) and another one to clear all selected filters.
Besides that, the view consists of a bunch of buttons to set some of the preselected filters of the component. Those are not all, and of course you could also tweak the level input with another slider if you want to!
Finally the web-photo-filter component does all the heavy lifting for us. We need to connect it to our filter and level and set the function as a callback which is called after the filter was applied.
In the beginning you would also see another image below the canvas area which shows the original image if you set the keep property to true. We add some CSS (in a second) depending on our selected filter so we either see the original image or just the image filter canvas!
Open the pages/home/home.html and change it to:
|
1 2 3 4 5 6 7 8 9 10 11 12 13 14 15 16 17 18 19 20 21 22 23 24 25 26 27 28 29 30 31 32 33 34 35 36 37 38 39 40 41 42 43 44 45 46 47 48 49 50 51 52 53 54 55 56 57 58 59 60 61 |
<ion-header> <ion-navbar color="primary"> <ion-buttons left> <button ion-button icon-only (click)="filter(null, 1)" *ngIf="image"> <ion-icon name="close"></ion-icon> </button> </ion-buttons> <ion-title> Ionic Image Filter </ion-title> <ion-buttons right> <button ion-button icon-only (click)="captureImage()"> <ion-icon name="camera"></ion-icon> </button> </ion-buttons> </ion-navbar> </ion-header> <ion-content padding> <ion-row *ngIf="image"> <ion-col> <button ion-button outline color="primary" (click)="filter('Sepia')"> Sepia </button> </ion-col> <ion-col> <button ion-button outline color="primary" (click)="filter('Polaroid')"> Polaroid </button> </ion-col> <ion-col> <button ion-button outline (click)="filter('greyscale')"> Grey </button> </ion-col> <ion-col> <button ion-button outline (click)="filter('contrast')"> Contrast </button> </ion-col> <ion-col> <button ion-button outline (click)="filter('brightness', 1.7)"> Bright </button> </ion-col> <ion-col> <button ion-button outline (click)="filter('saturation')"> Saturation </button> </ion-col> <ion-col> <button ion-button outline (click)="filter('hue', 120)"> Hue </button> </ion-col> </ion-row> <web-photo-filter [class.only-original]="!selectedFilter" [class.no-original]="selectedFilter" [src]="image" [filter]="selectedFilter" [level]="level" keep="true" (filterLoad)="imageLoaded($event)"></web-photo-filter> </ion-content> |
The tiny CSS we can use makes the canvas look a bit better and also has the two rules we apply conditionally to our component, so go ahead and add them to the pages/home/home.scss:
|
1 2 3 4 5 6 7 8 9 10 11 |
page-home { canvas { width: 100%; } .no-original img.display-no-filter { display: none !important; } .only-original canvas { display: none !important; } } |
Now your Ionic image filter is ready and if you’ve added a local image to the assets folder you can immediately test the behaviour inside your browser!
Filter Out Older Devices
The creator of this component was super helpful when I’ve encountered a little bug and also offer some of his code to filter out older devices that can’t use this way of changing images using WebGL.
I’ve not added this to the main part as it blows up the class a bit but if you are using this component in a real app consider adding these functions:
|
1 2 3 4 5 6 7 8 9 10 11 12 13 14 15 16 17 18 19 20 21 22 23 24 25 26 27 28 29 30 31 32 33 34 35 36 37 38 39 40 41 42 |
private isAdvancedModeIOS(): boolean { if (!this.device.model) { return false; } // No Filter on iPhone < 6 // See https://www.theiphonewiki.com/wiki/Models for model list // iPhone 5s = iPhone6,1 or iPhone 6,2 if (this.device.model.indexOf('iPhone1') > -1 || this.device.model.indexOf('iPhone2') > -1 || this.device.model.indexOf('iPhone3') > -1 || this.device.model.indexOf('iPhone4') > -1 || this.device.model.indexOf('iPhone5') > -1 || this.device.model.indexOf('iPhone6') > -1) { return false; } return true; } private isAdvancedModeAndroid(): boolean { if (!this.device.version) { return false; } if (this.device.version.length < 1) { return false; } if (this.device.version.startsWith('1') || this.device.version.startsWith('2') || this.device.version.startsWith('3') || this.device.version.startsWith('4') || this.device.version.startsWith('5') || this.device.version.startsWith('6')) { return false; } return true; } |
Again, many thanks to David Dal Busco for creating this great component, making it public available and also offering fast support! Originally he built the component for his app Fluster so go ahead and check it out in action and also support his project.
You can also find a video version of this quick win below.