
So you just noticed that Ionic 4 was released and you finally want to get started with cross platform app development? Well today is your days because we’ll go through building your first Ionic 4 application with HTTP Calls to the Open Movie Database!
Whether you are completely new to Ionic at all or have used other versions of Ionic before and now decided to get started with version 4, we go through all the basics to setup a new app, routing and even API calls to display async data inside our app.
Ready? Go!
Setting up Our Ionic 4 App
If you are new to Ionic you need to make sure you have the Node Package Manager installed but if you have worked with other web technologies before chances are pretty good you already got everything you need.
So then if you also haven’t used Ionic before, you need to install it trough npm and then you are finally ready to create your Ionic 4 project!
To setup a blank project you can use the Ionic CLI so we end up with a fresh Ionic 4 project with Angular support (you could also use React or Vue, better support coming later this year).
Once the project is created we cd into the folder and also use the CLI, which basically uses the Angular CLI under the hood, to create new pages for our app that we want to display.
Now go ahead and run the commands below from your terminal:
|
1 2 3 4 5 6 7 8 9 10 11 |
# Install Ionic if you haven't before npm install -g ionic # Create a blank new Ionic 4 app with Angular support ionic start movieApp blank --type=angular cd movieApp # Use the CLI to generate some pages and a service ionic g page pages/movies ionic g page pages/movieDetails ionic g service services/movie |
You can now directly bring up your app by running the following command inside your project:
|
1 |
ionic serve |
This will open the browser with the preview of your app which will reload automatically once you change anything inside your project.
Speaking of project, we got a bunch of files and folders in here, let’s see what all of this means. We will focus on the src folder of our app since we don’t have to worry about the rest for now.
App
This is the folder where we will make all the code changes that follow later in this tutorial. It already contains a home folder that’s basically a page like we created before, but I like to have all pages in their own pages folder so you can remove the home folder as well for now.
The pages folder contains the actual views/pages of our app, which means the element we will see on the screen. Right now we already got 2 pages in here, and each page you create with the CLI comes with 4 files:
- *.module.ts: The Angular module for a page. Each page is basically their own module (related to the Angular architecture) with imports and styling
- *.page.html: The HTML markup for a page
- *.page.scss: The styling for the specific page (more on global styling later)
- *.page.spec.ts: An automatically added testing file for your page. Good if you want to set up automated unit tests
- *.page.ts: The controller for a page that contains the Javascript code that manages the functionality
The services folder contains our previously created service – this is about structuring your app according to best practices and separating concerns between thew view and the actual data of your app. The service will take care of handling the API calls and simply return the data to our view later!
Assets
This folder contains all the images, fonts or whatever assets you need for your app later down the road.
Environments
From time to time your project might have a development, staging and production environment with different servers that your app targets. The environment folder helps to set up information for different environments so we can later simply build our Ionic app with a command line flag and it automatically takes the right values. Very handy!
Theme
This folder only contains the variables.scss that contains predefined color information from Ionic. We can always change this file and even use a tool like the Ionic Color Generator to create our own flavoured version of this file!
Outside of the folder we also got the global.scss in which we can write some SCSS that will be globally applied to our app – but we can also define it just for one page in their own styling files.
Other Files
The most relevant of the other files might be the index.html because just like with every other website, this file marks the entry point to our app! For now though we don’t need to change a thing in here so let’s now start to get into the actual code.
Prerequisite Routing & HTTP Calls
With Ionic 4 we move on from a proprietary routing concept to the standard Angular Router. The markup might look a bit more difficult in the beginning, but it actually makes totally sense.
For all the connections inside your app you setup routing information upfront – just like you navigate around on a website!
In our app we need 2 routes:
- /movies – Navigate to our first page which should display a list of movies
- /movies/:id – We want to be able to show the details for one movie so we add a param :id to the route that we can dynamically resolve
We also need to connect the according page (more specific: the module of the page) to the route so Angular knows how to resolve a specific route. We supply this information using loadChildren which actually only gets a string to the module path.
This means we are not really importing another module here therefore the pages are using lazy loading and will only be loaded once we navigate there!
To setup our routing information open our app/app-routing.module.ts and change it to:
|
1 2 3 4 5 6 7 8 9 10 11 12 13 14 |
import { NgModule } from '@angular/core'; import { Routes, RouterModule } from '@angular/router'; const routes: Routes = [ { path: '', redirectTo: 'movies', pathMatch: 'full' }, { path: 'movies', loadChildren: './pages/movies/movies.module#MoviesPageModule' }, { path: 'movies/:id', loadChildren: './pages/movie-details/movie-details.module#MovieDetailsPageModule' } ]; @NgModule({ imports: [RouterModule.forRoot(routes)], exports: [RouterModule] }) export class AppRoutingModule { } |
By making this change we have also disconnected the home page which was initially in the project (and which you might have deleted already at this point).
Now the app will load our movies page as the first page, great! You should also notice this change in your running ionic serve instance already.
Tip: If you want to get a better feeling for how your app will look on a real device you can also run ionic lab instead of serve but you have to install the package upfront:
|
1 2 3 4 5 |
# Install the Lab Package npm i @ionic/lab # Run your app with device preview and platform styles ionic lab |
This package was previously bundled with every new app but needs to be installed for Ionic 4 now.
/Tip End
We also need to apply another change to our app as we want to make HTTP calls and therefore need to import another Angular module for making those requests.
The way of doing this is the same like with Ionic 3, we just need to add the HttpClientModule to our main module file and add it to the array of imports like this inside our app/app.module.ts:
|
1 2 3 4 5 6 7 8 9 10 11 12 13 14 15 16 17 18 19 20 21 22 23 24 25 |
import { NgModule } from '@angular/core'; import { BrowserModule } from '@angular/platform-browser'; import { RouteReuseStrategy } from '@angular/router'; import { IonicModule, IonicRouteStrategy } from '@ionic/angular'; import { SplashScreen } from '@ionic-native/splash-screen/ngx'; import { StatusBar } from '@ionic-native/status-bar/ngx'; import { AppComponent } from './app.component'; import { AppRoutingModule } from './app-routing.module'; import { HttpClientModule } from '@angular/common/http'; @NgModule({ declarations: [AppComponent], entryComponents: [], imports: [BrowserModule, IonicModule.forRoot(), AppRoutingModule, HttpClientModule], providers: [ StatusBar, SplashScreen, { provide: RouteReuseStrategy, useClass: IonicRouteStrategy } ], bootstrap: [AppComponent] }) export class AppModule {} |
Before we dive into more Ionic 4 code we first have to set up the service that powers our app and handles all the HTTP requests that we later want to call.
Making HTTP Requests
A service is the same like in previous versions a provider and can be injected to our controller in order to call its functions.
In order to use the Open Movie Database you need to request an API key and insert it into our service – the process is free so go ahead right now.
With the API we can now search for strings and get results in form of movies, episodes or even games. Also, we can get detailed information for one specific object of those results so a perfect use case for our first Ionic 4 app!
Our service only needs 2 functions:
searchData(): This function searches for results to a specific title and search type – an enum we defined upfront to represent the types that we can pass to the API using TypeScript!getDetails(): This function returns the detailed information for one specific element, will be used on our details page
Both functions will return an Observable which is like a Promise on steroids. No serious, it’s like a stream of events that we can subscribe to. Explaining this concept would take another post so for now let’s use it and keep in mind that both of our functions are async – they will return the API data not immediately.
Now go ahead and change your services/movie.service.ts to:
|
1 2 3 4 5 6 7 8 9 10 11 12 13 14 15 16 17 18 19 20 21 22 23 24 25 26 27 28 29 30 31 32 33 34 35 36 37 38 39 40 41 42 43 44 45 46 47 48 49 50 |
import { Injectable } from '@angular/core'; import { HttpClient } from '@angular/common/http'; import { Observable } from 'rxjs'; import { map } from 'rxjs/operators'; // Typescript custom enum for search types (optional) export enum SearchType { all = '', movie = 'movie', series = 'series', episode = 'episode' } @Injectable({ providedIn: 'root' }) export class MovieService { url = 'http://www.omdbapi.com/'; apiKey = ''; // <-- Enter your own key here! /** * Constructor of the Service with Dependency Injection * @param http The standard Angular HttpClient to make requests */ constructor(private http: HttpClient) { } /** * Get data from the OmdbApi * map the result to return only the results that we need * * @param {string} title Search Term * @param {SearchType} type movie, series, episode or empty * @returns Observable with the search results */ searchData(title: string, type: SearchType): Observable<any> { return this.http.get(`${this.url}?s=${encodeURI(title)}&type=${type}&apikey=${this.apiKey}`).pipe( map(results => results['Search']) ); } /** * Get the detailed information for an ID using the "i" parameter * * @param {string} id imdbID to retrieve information * @returns Observable with detailed information */ getDetails(id) { return this.http.get(`${this.url}?i=${id}&plot=full&apikey=${this.apiKey}`); } } |
I’ve also added some documentation to the functions – with a tool like Compodoc you could now create a nice documentation!
Alright, now we are finally ready for some more Ionic 4 code!
Searching for Movies
We start our apps functionality with the things that happen in the background and then build the view on top of it.
So right now we need to implement the logic to submit a searchterm and type to our service and receive the results. Therefore, we inject the service through our constructor so it’s available to the class.
In another function that we call searchChanged() we will now simply call the according function of our service and set the result to a local variable b>results. Our view will later handle the data that comes from the API and display it using this variable.
We also keep 2 more variables for the searchTerm and type inside our class that we pass to the service – we will connect with them from the view as well so we can change them.
Now go ahead with the code for your controller inside the pages/movies/movies.page.ts:
|
1 2 3 4 5 6 7 8 9 10 11 12 13 14 15 16 17 18 19 20 21 22 23 24 25 26 27 28 |
import { MovieService, SearchType } from './../../services/movie.service'; import { Component, OnInit } from '@angular/core'; import { Observable } from 'rxjs'; @Component({ selector: 'app-movies', templateUrl: './movies.page.html', styleUrls: ['./movies.page.scss'], }) export class MoviesPage implements OnInit { results: Observable<any>; searchTerm: string = ''; type: SearchType = SearchType.all; /** * Constructor of our first page * @param movieService The movie Service to get data */ constructor(private movieService: MovieService) { } ngOnInit() { } searchChanged() { // Call our service function which returns an Observable this.results = this.movieService.searchData(this.searchTerm, this.type); } } |
Now the view which looks a lot like Ionic 3 code, just a few of the elements changed their names and properties. For everyone new to Ionic in general: Welcome to your first Ionic components!
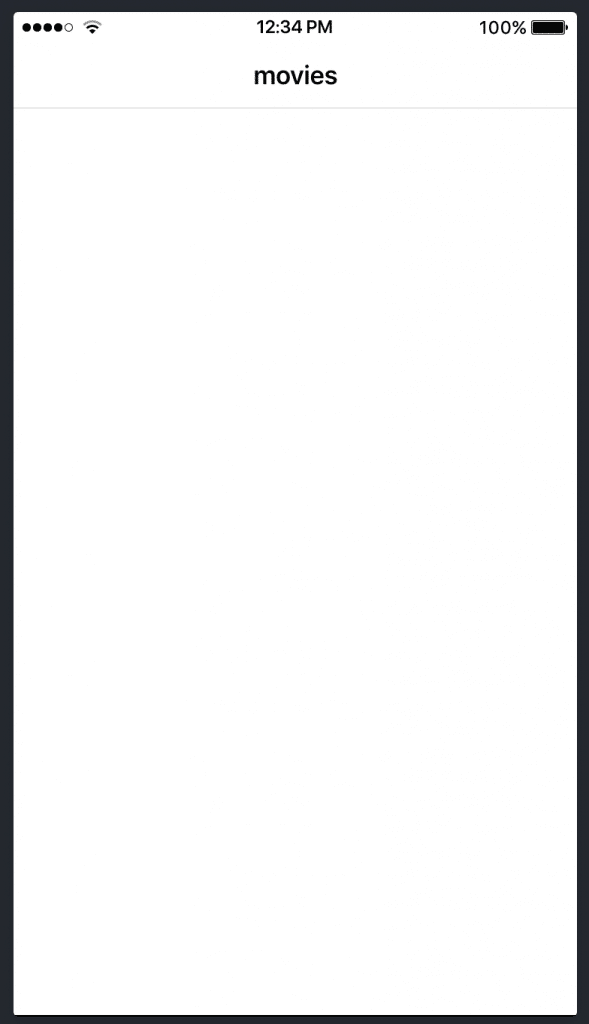
A page can be separated in 3 areas: Header, content, footer. In our case we don’t want a footer so we only define the header area with a title and the content with our actual elements for the search.
The first element that affects the search is the ion-searchbar which is a simple input you have seen in many apps before to search for a term.
We always want to call our search functionality when the type or searchTerm changes, and we can do this by catching the (ionChange) event of some of our elements.
Below we got a select drop down with options and the according value for the different types that we could pass back to the API.
You should have also noticed the [(ngModel)] syntax through which both elements are connected to our controller properties – so if one side changes, the other will automatically get the new value as well (also known as 2 way data binding).
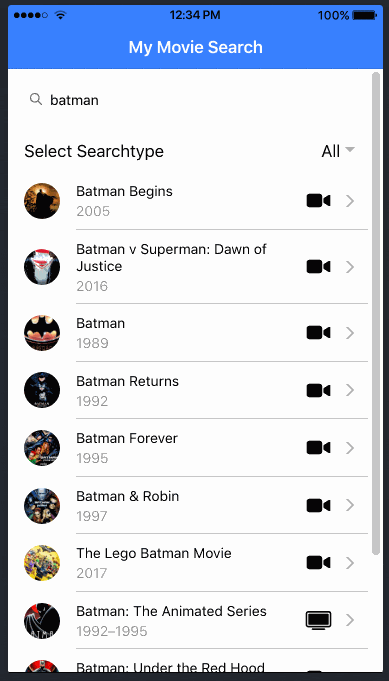
So we got the search in place and now add another list with elements below our previous components.
For the list we use an iteration over our results variable and because this variable is an Observable (remember the implementation in our service) we need to add an Angular Pipe “| async” to it so the view subscribes to the Observable and handles the changes accordingly.
We also add the routing directly to this element by using [routerLink]: We construct the path that we want to open when we click on the element, and we use the imdbID property of the item so we can resolve the information on our details page later.
Besides that we create the markup for one item using the Poster which is an image, the title, year and finally also a cool icon at the and based on the type of the item. Yes, those cool icons are already bundled with your app and are called Ionicons!
With all of that in mind change your pages/movies/movies.page.html to:
|
1 2 3 4 5 6 7 8 9 10 11 12 13 14 15 16 17 18 19 20 21 22 23 24 25 26 27 28 29 30 31 32 33 34 35 36 37 38 39 40 41 |
<ion-header> <ion-toolbar color="primary"> <ion-title>My Movie Search</ion-title> </ion-toolbar> </ion-header> <ion-content> <ion-searchbar [(ngModel)]="searchTerm" (ionChange)="searchChanged($event)"></ion-searchbar> <ion-item> <ion-label>Select Searchtype</ion-label> <ion-select [(ngModel)]="type" (ionChange)="searchChanged($event)"> <ion-select-option value="">All</ion-select-option> <ion-select-option value="movie">Movie</ion-select-option> <ion-select-option value="series">Series</ion-select-option> <ion-select-option value="episode">Episode</ion-select-option> </ion-select> </ion-item> <ion-list> <ion-item button *ngFor="let item of (results | async)" [routerLink]="['/', 'movies', item.imdbID]"> <ion-avatar slot="start"> <img [src]="item.Poster" *ngIf="item.Poster != 'N/A'"> </ion-avatar> <ion-label text-wrap> <h3>{{ item.Title }}</h3> {{ item.Year }} </ion-label> <ion-icon slot="end" *ngIf="item.Type == 'movie'" name="videocam"></ion-icon> <ion-icon slot="end" *ngIf="item.Type == 'series'" name="tv"></ion-icon> <ion-icon slot="end" *ngIf="item.Type == 'game'" name="game-controller"></ion-icon> </ion-item> </ion-list> </ion-content> |
By now you should be able to search for a specific term inside your app and get a list of results – that’s already a big win!
If you are coming form Ionic 3 you might have also noted another new property called slot so here’s a short info on that:
Ionic 4 components are built using Stencil (yeah, they actually created that tool as well!) so they are standard web components – you could import them basically everywhere on the web! These components also use the Shadow DOM API and are basically living outside the scope of your regular DOM elements.
That means also standard styling will sometimes not affect these components like it was possible in previous versions!
In order to get information into these components we can inject certain parts of HTML into their slots that are defined on these elements – you can see how their implementation looks like on the example of the ion-item we used here.
Presenting Detailed Information
Ok enough of background information, let’s put some more work into the details page of our app. We have implemented a route and we also created a button that passed an ID with that route so the details page will be open, but we need to get access to the ID!
With previous Ionic versions we could easily pass whole objects to new pages, this is now not a best practice anymore. Instead, we pass only small chunks of information (like an ID) with the URL because otherwise you would end up with a huge JSON stringified term inside the URL which isn’t really something we want to have.
To get access to this ID field (that we already defined inside our routing in the beginning) we can use the ActivatedRoute and its properties.
So after we extract the ID from the params we can make another call to our service (that we injected through the constructor again) and get the detailed information for whatever ID we got.
Nothing really new so let’s add the following code to our pages/movie-details/movie-details.page.ts:
|
1 2 3 4 5 6 7 8 9 10 11 12 13 14 15 16 17 18 19 20 21 22 23 24 25 26 27 28 29 30 31 32 33 34 |
import { MovieService } from './../../services/movie.service'; import { Component, OnInit } from '@angular/core'; import { ActivatedRoute } from '@angular/router'; @Component({ selector: 'app-movie-details', templateUrl: './movie-details.page.html', styleUrls: ['./movie-details.page.scss'], }) export class MovieDetailsPage implements OnInit { information = null; /** * Constructor of our details page * @param activatedRoute Information about the route we are on * @param movieService The movie Service to get data */ constructor(private activatedRoute: ActivatedRoute, private movieService: MovieService) { } ngOnInit() { // Get the ID that was passed with the URL let id = this.activatedRoute.snapshot.paramMap.get('id'); // Get the information from the API this.movieService.getDetails(id).subscribe(result => { this.information = result; }); } openWebsite() { window.open(this.information.Website, '_blank'); } } |
We also added another function to open a website using the window object and the information from the data of the API that we stored in the local information variable.
Now we just need to create a view based on the JSON information of the API. It always helps to log() out the info you got so you see keys that you can use to display some values.
In our case we use the Ionic card component and add the image and some items with information and more icons (did I say I really like the Ionicons?).
We also added a button below that card that will be displayed if the result information contains the website key. We just have to add our function to the (click) event of the button in order to hook everything up!
On another note, we also have to add an ion-back-button to the header of that page in order to get a nice little back arrow to our previous movie list page. This was automatically done in v3 but needs to implemented manually as of v4!
Now finish your details view by changing your pages/movie-details/movie-details.page.html to:
|
1 2 3 4 5 6 7 8 9 10 11 12 13 14 15 16 17 18 19 20 21 22 23 24 25 26 27 28 29 30 31 32 33 34 35 36 37 38 39 40 41 42 43 44 45 46 47 |
<ion-header> <ion-toolbar color="primary"> <ion-buttons slot="start"> <ion-back-button defaultHref="/"></ion-back-button> </ion-buttons> <ion-title>{{ information?.Genre }}</ion-title> </ion-toolbar> </ion-header> <ion-content padding> <ion-card *ngIf="information"> <ion-card-header> <ion-card-title> {{ information.Title }} </ion-card-title> <ion-card-subtitle> {{ information.Year }} </ion-card-subtitle> </ion-card-header> <ion-card-content text-center> <img [src]="information.Poster" class="info-img"> {{ information.Plot }} <ion-item lines="none"> <ion-icon name="star-half" slot="start"></ion-icon> <ion-label>{{ information.imdbRating }}</ion-label> </ion-item> <ion-item lines="none"> <ion-icon name="clipboard" slot="start"></ion-icon> <ion-label text-wrap>{{ information.Director }}</ion-label> </ion-item> <ion-item lines="none"> <ion-icon name="contacts" slot="start"></ion-icon> <ion-label text-wrap>{{ information.Actors }}</ion-label> </ion-item> <ion-button expand="full" (click)="openWebsite()" *ngIf="information.Website && information.Website != 'N/A'"> <ion-icon name="open" slot="start"></ion-icon> Open Website </ion-button> </ion-card-content> </ion-card> </ion-content> |
If you now take a look at your browser you might notice that the image looks waaaay to big as its taking all the space available. Let’s change this through some good old CSS so open your pages/movie-details/movie-details.page.scss and insert:
|
1 2 3 4 5 |
.info-img { max-height: 30vh; object-fit: contain; padding: 10px; } |
Now our results looks a lot more appealing.
We can search, select a movie type, dive into a search result and have a fully functional Ionic 4 app with HTTP calls finished!
Conclusion
While it was a straight forward experience to build our first Ionic 4 app there are so many things we haven’t talked enough about.
UI patterns like Tabs and side menu, CSS variables, responsive layout and PWA to just name a few on the side of Ionic and Angular.
And we haven’t even touched the Cordova side of things to actually build this app into a real native mobile app!
If you want to learn how to develop Ionic 4 apps as fast as possible and get them to the iOS & Android app stores quickly you can join the Ionic Academy today and enjoy expert screen casts, a library of quick wins and a community to support you on your journey!
And of course I (Simon) am also present inside to answer all your questions all the time 🙂
You can also find a video version of this guide below!