When you are migrating your Ionic 3 app to Ionic 4 one of the biggest problems you will face is converting your logic to the new routing. Especially passing objects to new routes becomes problematic as you should rely on only using IDs inside the path.
In this Quick Win we will look at 3 different solutions to pass data with Angular Router to your Ionic pages. Not all of them are recommended, but all of them would work and can make your life a lot easier when migrating your app to Ionic 4.
Setting up the App
Before we get into the details we need a testing app. Therefore, start a blank new app and add one details page that we can navigate to:
|
1 2 3 |
ionic start academyNavigation blank --type=angular cd academyNavigation ionic g page details |
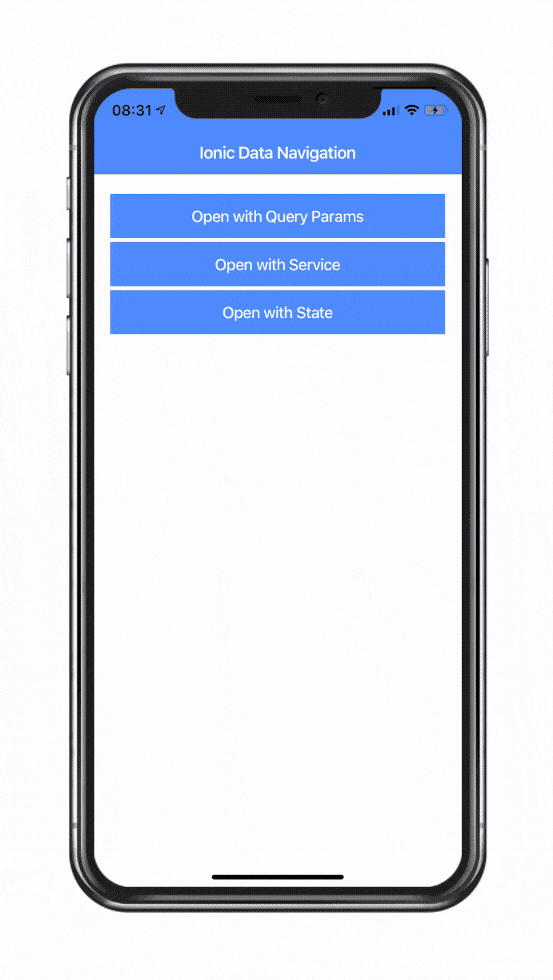
Now we need some buttons to trigger our actions so simply add a few to our app/home/home.page.html:
|
1 2 3 4 5 6 7 8 9 10 11 12 13 14 15 16 17 18 19 20 21 |
<ion-header> <ion-toolbar> <ion-title> Ionic Data Navigation </ion-title> </ion-toolbar> </ion-header> <ion-content padding> <ion-button expand="full" (click)="openDetailsWithQueryParams()"> Open with Query Params </ion-button> <ion-button expand="full" (click)="openDetailsWithService()"> Open with Service </ion-button> <ion-button expand="full" (click)="openDetailsWithState()"> Open with State </ion-button> </ion-content> |
Also, the details page will always have the same markup which just displays a few values that we (hopefully) pass to the page. Go ahead and change the app/details/details.page.html to:
|
1 2 3 4 5 6 7 8 9 10 11 12 13 14 15 16 17 18 19 20 21 22 23 24 25 26 |
<ion-header> <ion-toolbar> <ion-buttons slot="start"> <ion-back-button defaultHref="/"></ion-back-button> </ion-buttons> <ion-title>Details</ion-title> </ion-toolbar> </ion-header> <ion-content padding> <ion-card *ngIf="data"> <ion-card-header> <ion-card-title> {{ data.name }} </ion-card-title> <ion-card-subtitle> {{ data.website }} </ion-card-subtitle> </ion-card-header> <ion-card-content> <ion-item *ngFor="let i of data.interests"> {{ i }} </ion-item> </ion-card-content> </ion-card> </ion-content> |
Now we can get into the three different solutions we got for our problem.
1. Using Query Params (bad)
The first option is more like an ugly hackish thing and not recommended. Still, I wanted to include this way as well so you know about it.
The trick here is to use Query params which are normally in your URL like ionic.com?user=simon&skill=ionic.
We can create these parameters with the Angular router as well, and we are normally limited to strings – but we can of course stringify every object as well, right?
Therefore, you can change the code inside your app/home/home.page.ts to:
|
1 2 3 4 5 6 7 8 9 10 11 12 13 14 15 16 17 18 19 20 21 22 23 24 25 26 27 28 29 30 31 32 33 34 |
import { Component } from '@angular/core'; import { Router } from '@angular/router'; @Component({ selector: 'app-home', templateUrl: 'home.page.html', styleUrls: ['home.page.scss'], }) export class HomePage { user = { name: 'Simon Grimm', website: 'www.ionicacademy.com', address: { zip: 48149, city: 'Muenster', country: 'DE' }, interests: [ 'Ionic', 'Angular', 'YouTube', 'Sports' ] }; constructor(private router: Router) { } openDetailsWithQueryParams() { let navigationExtras: NavigationExtras = { queryParams: { special: JSON.stringify(this.user) } }; this.router.navigate(['details'], navigationExtras); } } |
Now we create additional information that we pass to the routing and we include our user object in the query params as a string.
When you do this, the page you navigate to receives the value but of course only as a string so you need to convert it back then.
But this can be done pretty easily, we just have to subscribe to the changes of the query params of the navigation and then we are able to use the result like this inside the app/details/details.page.ts:
|
1 2 3 4 5 6 7 8 9 10 11 12 13 14 15 16 17 18 19 20 21 |
import { Component, OnInit } from '@angular/core'; import { ActivatedRoute, Router } from '@angular/router'; @Component({ selector: 'app-details', templateUrl: './details.page.html', styleUrls: ['./details.page.scss'], }) export class DetailsPage implements OnInit { data: any; constructor(private route: ActivatedRoute, private router: Router) { this.route.queryParams.subscribe(params => { if (params && params.special) { this.data = JSON.parse(params.special); } }); } } |
Again, this is a pretty dirty solution. If you only pass small chunks of information inside of the query params that’s fine, but look how the URL would look like in our case:
|
1 |
http://localhost:8100/details?special=%7B%22name%22:%22Simon%20Grimm%22,%22website%22:%22www.ionicacademy.com%22,%22address%22:%7B%22zip%22:48149,%22city%22:%22Muenster%22,%22country%22:%22DE%22%7D,%22interests%22:%5B%22Ionic%22,%22Angular%22,%22YouTube%22,%22Sports%22%5D%7D |
You don’t really want to have that, so let’s explore a more recommended way.
2. Service and Resolve Function (legit)
A better way (besides using only an ID and then making another call from the details page) is to use a service in the middle to keep track of your data.
Therefore, generate a service and another service that we will use as a resolver (not 100% needed but recommended):
|
1 2 |
ionic g service services/data ionic g service resolver/dataResolver |
The service has very limited functionality in our example as it’s just to showcase the way of doing things so change the services/data.service.ts to:
|
1 2 3 4 5 6 7 8 9 10 11 12 13 14 15 16 17 18 19 |
import { Injectable } from '@angular/core'; @Injectable({ providedIn: 'root' }) export class DataService { private data = []; constructor() { } setData(id, data) { this.data[id] = data; } getData(id) { return this.data[id]; } } |
This service can be used from everywhere inside our app and will exist as one instance only – so we can use it perfectly to hold some data for us.
We could also use this service directly now by setting the value before navigating and then getting the data again on the next page but we’ll also use a resolver. We’ve also talked about this when using route guards and resolver.
By using a resolver you can make sure the data is already available in your page once you arrive there. That means, you don’t have to use the safe navigation operator inside the view or wrap everything inside an *ngIf.
The resolver could be implemented simply like this inside the app/resolver/data-resolver.service.ts:
|
1 2 3 4 5 6 7 8 9 10 11 12 13 14 15 16 |
import { DataService } from './../services/data.service'; import { Injectable } from '@angular/core'; import { Resolve, ActivatedRouteSnapshot } from '@angular/router'; @Injectable({ providedIn: 'root' }) export class DataResolverService implements Resolve<any> { constructor(private dataService: DataService) { } resolve(route: ActivatedRouteSnapshot) { let id = route.paramMap.get('id'); return this.dataService.getData(id); } } |
Now we also need to change the routing a bit so it includes both an ID that we can pass to the page (like you have seen in many tutorials) but additionally also the resolve function we just created, so change the app/app-routing.module.ts to:
|
1 2 3 4 5 6 7 8 9 10 11 12 13 14 15 16 17 18 19 20 21 22 |
import { DataResolverService } from './resolver/data-resolver.service'; import { NgModule } from '@angular/core'; import { Routes, RouterModule } from '@angular/router'; const routes: Routes = [ { path: '', redirectTo: 'home', pathMatch: 'full' }, { path: 'home', loadChildren: './home/home.module#HomePageModule' }, { path: 'details', loadChildren: './details/details.module#DetailsPageModule' }, { path: 'details/:id', resolve: { special: DataResolverService }, loadChildren: './details/details.module#DetailsPageModule' } ]; @NgModule({ imports: [RouterModule.forRoot(routes)], exports: [RouterModule] }) export class AppRoutingModule { } |
Now whenever we navigate to that route, the resolver will strike and try to get the ID from the route, look up the data from our service and return it.
That means the mechanism is in place and we just have to call it accordingly, so add a new function openDetailsWithService that both stores the local data to our service and then makes the navigation call inside the app/home/home.page.ts:
|
1 2 3 4 5 6 7 8 9 10 11 12 13 14 15 16 17 18 19 20 21 22 23 24 25 26 27 28 29 30 31 |
import { Component } from '@angular/core'; import { Router } from '@angular/router'; import { DataService } from '../services/data.service'; @Component({ selector: 'app-home', templateUrl: 'home.page.html', styleUrls: ['home.page.scss'], }) export class HomePage { user = { name: 'Simon Grimm', website: 'www.ionicacademy.com', address: { zip: 48149, city: 'Muenster', country: 'DE' }, interests: [ 'Ionic', 'Angular', 'YouTube', 'Sports' ] }; constructor(private router: Router, private dataService: DataService) { } openDetailsWithService() { this.dataService.setData(42, this.user); this.router.navigateByUrl('/details/42'); } } |
As said, the resolver will now resolve all information for us upfront so inside the app/details/details.page.ts we got immeditaley access to the resolved information that we have named special inside the routing setup before:
|
1 2 3 4 5 6 7 8 9 10 11 12 13 14 15 16 17 18 19 20 21 22 |
import { Component, OnInit } from '@angular/core'; import { ActivatedRoute, Router } from '@angular/router'; @Component({ selector: 'app-details', templateUrl: './details.page.html', styleUrls: ['./details.page.scss'], }) export class DetailsPage implements OnInit { data: any; constructor(private route: ActivatedRoute, private router: Router) { } ngOnInit() { if (this.route.snapshot.data['special']) { this.data = this.route.snapshot.data['special']; } } } |
This way includes a lot more steps then with the first solution, however it’s one of the best ways to pass data around. You could even add storage to the service to persist the information so you could load it if you only refresh the page!
3. Using Extras State (new since Angular 7.2)
Finally, a solution I only discovered when writing this Quick Win that was added since Angular 7.2 (which your Ionic 4 app should have).
This is almost like you wish it to be, simple and clean, just attaching whatever information to the additional routing extras and then unwrapping them in your page.
You can add whatever object you want to the state like this inside your app/home/home.page.ts:
|
1 2 3 4 5 6 7 8 9 10 11 12 13 14 15 16 17 18 19 20 21 22 23 24 25 26 27 28 29 30 31 32 33 34 |
import { Component } from '@angular/core'; import { Router, NavigationExtras } from '@angular/router'; @Component({ selector: 'app-home', templateUrl: 'home.page.html', styleUrls: ['home.page.scss'], }) export class HomePage { user = { name: 'Simon Grimm', website: 'www.ionicacademy.com', address: { zip: 48149, city: 'Muenster', country: 'DE' }, interests: [ 'Ionic', 'Angular', 'YouTube', 'Sports' ] }; constructor(private router: Router) { } openDetailsWithState() { let navigationExtras: NavigationExtras = { state: { user: this.user } }; this.router.navigate(['details'], navigationExtras); } } |
In the app/details/details.page.ts this information can now easily be accesed by using the Router directly and getting access to the extras:
|
1 2 3 4 5 6 7 8 9 10 11 12 13 14 15 16 17 18 19 20 21 22 |
import { Component, OnInit } from '@angular/core'; import { ActivatedRoute, Router } from '@angular/router'; @Component({ selector: 'app-details', templateUrl: './details.page.html', styleUrls: ['./details.page.scss'], }) export class DetailsPage implements OnInit { data: any; constructor(private route: ActivatedRoute, private router: Router) { this.route.queryParams.subscribe(params => { if (this.router.getCurrentNavigation().extras.state) { this.data = this.router.getCurrentNavigation().extras.state.user; } }); } ngOnInit() { } } |
If you are converting your Ionic 3 application to Ionic 4, most likely this is the easiest solution for your problem.
However, be aware that your passed data will be added to the history of the location so your app might end up holding onto a lot of data!
You can find the Github issue and further comments on this topic here.
Conclusion
Another solution would be to save data to the storage, navigate and then load the data again but it involves dealing with async code and would make the process even slower.
Therefore, the last proposed solution might be your best bet. However, keeping data inside the service instead of attaching it to the Router is also an equally good solution but it’s a bit more complex yet will work great if setup correctly once!
You can also find a video version of this Quick Win below.