
Welcome to the 2. lesson of the Ionic Crash Course!
Today is all about navigation inside the app we started in the first lesson. We want to change the appearance completely so we end up with a tab bar, a very typical pattern for all mobile apps.
To achieve this, we have to change a few parts and add new files to our project so we got a few more pages our users can navigate to!
1. Changing Our Project Structure
First of all we want to get rid of the current src/pages/home folder. We don’t have any specific hate about that page, but it was created without a module file and is not working nicely with Ionic lazy loading, therefore simply remove that folder!
We also have to remove the reference to the HomePage from our module, therefore also open the src/app/app.module.ts and change it to:
|
1 2 3 4 5 6 7 8 9 10 11 12 13 14 15 16 17 18 19 20 21 22 23 24 25 26 27 |
import { BrowserModule } from '@angular/platform-browser'; import { ErrorHandler, NgModule } from '@angular/core'; import { IonicApp, IonicErrorHandler, IonicModule } from 'ionic-angular'; import { SplashScreen } from '@ionic-native/splash-screen'; import { StatusBar } from '@ionic-native/status-bar'; import { MyApp } from './app.component'; @NgModule({ declarations: [ MyApp ], imports: [ BrowserModule, IonicModule.forRoot(MyApp) ], bootstrap: [IonicApp], entryComponents: [ MyApp ], providers: [ StatusBar, SplashScreen, {provide: ErrorHandler, useClass: IonicErrorHandler} ] }) export class AppModule {} |
Now our app won’t work anymore and you might get a few errors, but we are also not yet done with our restructuring process.
We now use the Ionic CLI to generate new pages. Yes, the CLI can handle this for us!
The command called generator can create different files inside our project, and the first type we use is page.
Go ahead and run these commands one by one from your command line inside the folder of your app:
|
1 2 3 4 5 |
ionic g page tabs ionic g page people ionic g page planets ionic g page films ionic g page filmDetails |
This will now create 5 new folders inside the pages folder.
If you don’t see a
|
1 2 3 4 5 6 7 8 9 10 11 12 13 14 15 16 |
import { NgModule } from '@angular/core'; import { IonicPageModule } from 'ionic-angular'; import { PeoplePage } from './people'; @NgModule({ declarations: [ PeoplePage, ], imports: [ IonicPageModule.forChild(PeoplePage), ], exports: [ PeoplePage ] }) export class PeoplePageModule {} |
Just change the highlighted lines to the names of the other pages and create the module files for them as well in the folders of the pages. If you have any problems setting this up, just let me know!
All of those files are not yet connected to our app, so we have to tell Ionic which is now the first page (after we deleted the HomePage).
As you already know, the entry point for our app is inside the app folder, and especially the first file is referenced inside src/app/app.components.ts, therefore open this file and set the rootPage of our app to be 'TabsPage‘:
|
1 2 3 4 5 6 7 8 9 10 11 12 13 14 15 16 17 18 |
import { Component } from '@angular/core'; import { Platform } from 'ionic-angular'; import { StatusBar } from '@ionic-native/status-bar'; import { SplashScreen } from '@ionic-native/splash-screen'; @Component({ templateUrl: 'app.html' }) export class MyApp { rootPage:any = 'TabsPage'; constructor(platform: Platform, statusBar: StatusBar, splashScreen: SplashScreen) { platform.ready().then(() => { statusBar.styleDefault(); splashScreen.hide(); }); } } |
You might wonder why we set the rootPage to a string?
Well, this is Ionic lazy loading in action!
If we would use only the name like TabsPage we would also need to import the complete module of that page, and all of this would happen before we actually use the page!
But by using strings here, Ionic handles everything internally and only loads the TabsPage when it is needed by it’s name.
Quite cool, isn’t it?
This helps to decrease loading times, especially when starting our app. Of course there is a lot more to tell about lazy loading and how to improve the process, but for now we are good and can actually start our app again!
2. Creating a Tab Bar
Although we created a TabsPage and set it as our rootPage we have no tabs. What the?
Cmon, you didn’t expect it to be so easy, right?
But actually we are only 2 easy steps away from a working Tab Bar, so let’s change the HTML of our current first page which is inside src/pages/tabs/tabs.html.
Not yet a member?
Join the Ionic Academy now and enjoy the full course library and learn everything Ionic!
We use the syntax for creating an Ionic Tab Bar, which consists of multiple tabs.
For every single tab we have to specify a root page, and if we like to also stuff like a title or icon. Go ahead and change all of the contents of src/pages/tabs/tabs.htmlto this:
|
1 2 3 4 5 |
<ion-tabs> <ion-tab [root]="tab1" tabTitle="Films" tabIcon="film"></ion-tab> <ion-tab [root]="tab2" tabTitle="People" tabIcon="people"></ion-tab> <ion-tab [root]="tab3" tabTitle="Planets" tabIcon="planet"></ion-tab> </ion-tabs> |
We define 3 tabs, assign a title and icon to each of them and tell which is the starting point of that tab.
You might wonder where the icons come from. With every Ionic project we can easily use all the great and free Ionicons!
By using them we can easily style our app and directly get cool icons without adding anything else!
We have told the tabs which is their first page, but as we have used the brackets around the word root we know that this is referencing a variable inside our class! If you didn’t knew it, you now know it.
This means we have to also apply a few changes to the src/pages/tabs/tabs.ts, as we need to create the 3 variables we used inside the view.
Each of those will be set to one of our created pages – just like we did in the beginning where we referenced our TabsPage as first page!
Therefore open your src/pages/tabs/tabs.ts and change it to:
|
1 2 3 4 5 6 7 8 9 10 11 12 13 14 15 |
import { Component } from '@angular/core'; import { IonicPage, NavController, NavParams } from 'ionic-angular'; @IonicPage() @Component({ selector: 'page-tabs', templateUrl: 'tabs.html', }) export class TabsPage { tab1 = 'FilmsPage'; tab2 = 'PeoplePage'; tab3 = 'PlanetsPage'; constructor(public navCtrl: NavController, public navParams: NavParams) { } } |
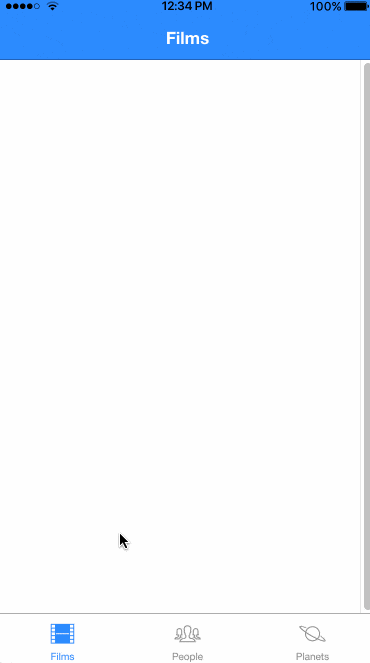
Now all 3 tabs have a page assigned, and you should see your Tab Bar view and can navigate to all 3 pages using the tabs like in the image below!
3. Change Views
We can now navigate let’s say “horizontal” but we also want to navigate “vertical” or in other words..

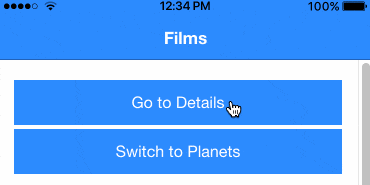
To be able to navigate to different pages we start by adding 2 buttons to the view of the FilmsPage.
We also get a first idea of the styling of Ionic apps by adding a color attribute to our top bar which will color it with the primary color (which is in general some kind of blue for Ionic).
Using the NavController
Our buttons will call 2 different functions, one to go deeper and one to switch Tabs through a function. Go ahead and change your src/pages/films/films.html to:
|
1 2 3 4 5 6 7 8 9 10 |
<ion-header> <ion-navbar color="primary"> <ion-title>Films</ion-title> </ion-navbar> </ion-header> <ion-content padding> <button ion-button full (click)="openDetails()">Go to Details</button> <button ion-button full (click)="goToPlanets()">Switch to Planets</button> </ion-content> |
You can also apply this styling and a reasonable name to all of your 3 pages which are currently your tabs!
Inside the class FilmsPage we now implement the functions for that view.
To navigate to a sub page we use the NavController and push a page onto the navigation stack. All of our app views are more or less a stack to which you can add pages or from which you can pop pages!
This video is from one of the Academy courses and explains the concept more detailed:
|
1 2 3 4 5 6 7 8 9 10 11 12 13 14 15 16 17 18 19 20 |
import { Component } from '@angular/core'; import { IonicPage, NavController, NavParams } from 'ionic-angular'; @IonicPage() @Component({ selector: 'page-films', templateUrl: 'films.html', }) export class FilmsPage { constructor(public navCtrl: NavController, public navParams: NavParams) { } openDetails() { this.navCtrl.push('FilmDetailsPage'); } goToPlanets() { this.navCtrl.parent.select(2); } } |
First, our openDetails uses the current navCtrl to push a new page. Again we use lazy loading and therefore only the name as a string!
Our second functions shows how we can also grab a reference to the current Tab Bar and manually navigate to for example the 3. tab by using select(2) (the counting starts at 0 like always).
If we now click the first button, we see a tiny animation that brings in the next view. And what we also see is that we automagically get a back arrow at the top!
This is done by Ionic internally, as we have pushed a page on the navigation stack. We can also change this behaviour or add a button on our own, but for now you can enjoy this comfort!
Passing Parameters
When you push a page, many times you go into details of something and therefore need a way to pass parameters to a next view. We can do this super easily, the only thing we need to add is an object to our call of push like this:
|
1 |
this.navCtrl.push('FilmDetailsPage', {filmId: 2}); |
Now we also push a data object to that page and can extract it inside the next page. This value is stored inside the NavParams which can be injected in our constructor.
Also, we want to add a function which can move one step back in our view stack, so we change your src/pages/film-details/film-details.ts to:
|
1 2 3 4 5 6 7 8 9 10 11 12 13 14 15 16 17 18 19 20 |
import { Component } from '@angular/core'; import { IonicPage, NavController, NavParams } from 'ionic-angular'; @IonicPage() @Component({ selector: 'page-film-details', templateUrl: 'film-details.html', }) export class FilmDetailsPage { filmId = null; constructor(public navCtrl: NavController, public navParams: NavParams) { this.filmId = this.navParams.get('filmId'); } goBack() { this.navCtrl.pop(); } } |
Inside the constructor we will our local variable with the value that we passed from the FilmsPage. And to go back, we only have to call our NavController again but this time pop the current view!
Finally we of course want to display that value and a button to actually go back, so the last changes for today need to be applied to the src/pages/film-details-page/film-details-page.html:
|
1 2 3 4 5 6 7 8 9 10 |
<ion-header> <ion-navbar color="primary"> <ion-title>Details</ion-title> </ion-navbar> </ion-header> <ion-content padding> Film ID: {{ filmId }} <button ion-button full (click)="goBack()">Go Back!</button> </ion-content> |
Nothing really new here, but now you can move through the different tabs with the Tab Bar and also know how the navigation of pushing and popping pages works!
4. Next Steps
Congratulations on finishing the 2. lesson!
Enough for today, enjoy your little project and tinker around with the current project.
In the next lesson we will make big progress towards our actual goal of using the Star Wars API!
We will learn to make HTTP calls and structure our app and data flow event better when using external resources like this, so be prepared.
Happy Coding,
Simon