
Welcome to the 2. lesson of the Ionic Crash Course!
Today is all about navigation inside the app we started in the first lesson. We want to change the appearance completely so we end up with a tab bar, a very typical pattern for all mobile apps.
To achieve this, we have to change a few parts and add new files to our project so we got a few more pages our users can navigate to!
1. Changing Our Project Structure
First of all we want to get rid of the current app/home folder. We don’t have any specific hate about that page, but it’s not really following the best way to structure our pages and components, therefore simply remove that folder!
Now our app won’t work anymore and you might get a few errors, but we are also not yet done with our restructuring process.
We now use the Ionic CLI to generate new pages. Yes, the CLI can handle this for us!
The command called generator (short “g”) can create different files inside our project, and the first type we use is page.
Go ahead and run these commands one by one from your command line inside the folder of your app:
|
1 2 3 4 5 |
ionic g page pages/tabs ionic g page pages/people ionic g page pages/planets ionic g page pages/films ionic g page pages/filmDetails |
This will now create 5 new folders inside the pages folder.
Additionally we create another module file with the last command inside the tabs folder because we have to establish some routing pretty soon.
All of these files will be automatically added to the standard routing configuration of your app inside app/app-routing.module.ts. In this file you can also see that the first path is ” “(empty string), which is the first page we browse to. This is set to the Home page (with a redirect to ‘home’) that we deleted previously and everything else was added like in the code below.
|
1 2 3 4 5 6 7 8 9 10 11 12 13 14 15 16 17 18 19 20 21 22 23 24 25 26 27 28 29 30 31 32 33 34 35 |
import { NgModule } from '@angular/core'; import { PreloadAllModules, RouterModule, Routes } from '@angular/router'; const routes: Routes = [ { path: '', redirectTo: 'home', pathMatch: 'full' }, { path: 'home', loadChildren: () => import('./home/home.module').then( m => m.HomePageModule)}, { path: 'tabs', loadChildren: () => import('./pages/tabs/tabs.module').then( m => m.TabsPageModule) }, { path: 'people', loadChildren: () => import('./pages/people/people.module').then( m => m.PeoplePageModule) }, { path: 'planets', loadChildren: () => import('./pages/planets/planets.module').then( m => m.PlanetsPageModule) }, { path: 'films', loadChildren: () => import('./pages/films/films.module').then( m => m.FilmsPageModule) }, { path: 'film-details', loadChildren: () => import('./pages/film-details/film-details.module').then( m => m.FilmDetailsPageModule) }, ]; @NgModule({ imports: [ RouterModule.forRoot(routes, { preloadingStrategy: PreloadAllModules }) ], exports: [RouterModule] }) export class AppRoutingModule { } |
This routing is the standard Angular routing system and what’s new since Ionic 4. Basically you tell your app at which routes (like in the address bar of your browser) should open which pages.
Additionally we don’t have to import the real pages here because we use lazy loading and only import the path of the module file for a page. That’s all we need in order for Angular to resolve a path and it results in faster loading times because the app is not loading every piece of code we have in the first file that is starting the app!
Pretty smart, isn’t it?
Of course there is a lot more to tell about lazy loading and how to improve the process, but for now we are good and need to focus on our app again as we have destroyed the routing for now.
2. Creating a Tab Bar
To get a tab bar we have to implement the general UI structure of it and then create the routing so all buttons open the right pages inside our app. This process is a bit more tricky then with Ionic 3 but you’ll get used to the new routing system pretty soon.
Note: There are also ways to use the old navigation system but I highly recommend to use this new system as it’s a lot closer to Angular core and will help you to switch over to Angular or build a web application more easily!
First of all we create the structure for the tab bar, so open your pages/tabs/tabs.page.html and replace it with:

|
1 2 3 4 5 6 7 8 9 10 11 12 13 14 15 16 17 18 19 20 21 22 |
<ion-tabs> <ion-tab-bar slot="bottom"> <ion-tab-button tab="films"> <ion-icon name="film"></ion-icon> <ion-label>Films</ion-label> </ion-tab-button> <ion-tab-button tab="people"> <ion-icon name="people"></ion-icon> <ion-label>People</ion-label> </ion-tab-button> <ion-tab-button tab="planets"> <ion-icon name="planet"></ion-icon> <ion-label>Planets</ion-label> </ion-tab-button> </ion-tab-bar> </ion-tabs> |
This will create a tab bar with 3 tabs and their according names (that will be the path later) plus additionally for each tab another definition of the actual elements with the icon and label for the tab.
You might wonder where the icons for our tabs come from. With every Ionic project we can easily use all the great and free Ionicons!
By using them we can easily style our app and directly get cool icons without adding anything else!
Now we have told the tab bar which routes to use for the different views, but our routing is not yet set up for this. First of all we change the entry point of our app to the tabs, which will then hold the additional routing logic. Therefore, go ahead and change your app/app-routing.module.ts to this:
|
1 2 3 4 5 6 7 8 9 10 11 12 13 14 |
import { NgModule } from '@angular/core'; import { PreloadAllModules, RouterModule, Routes } from '@angular/router'; const routes: Routes = [ { path: '', loadChildren: () => import('./pages/tabs/tabs.module').then( m => m.TabsPageModule)} ]; @NgModule({ imports: [ RouterModule.forRoot(routes, { preloadingStrategy: PreloadAllModules }) ], exports: [RouterModule] }) export class AppRoutingModule { } |
As you can see we removed all the other references and only load one child for the initial page, which is the Tabs Page module.
The routing we create in the routing file of our tabs page specifies the different paths of the routes and which component should be loaded for each.
This might still look scary but it’s actually super structured, so go ahead and add the routing inside the pages/tabs/tabs-routing.module.ts:
|
1 2 3 4 5 6 7 8 9 10 11 12 13 14 15 16 17 18 19 20 21 22 23 24 25 26 27 28 29 30 31 32 33 34 35 36 37 38 39 40 41 42 43 44 45 46 47 48 49 50 51 52 53 54 55 |
import { NgModule } from '@angular/core'; import { Routes, RouterModule } from '@angular/router'; import { TabsPage } from './tabs.page'; const routes: Routes = [ { path: 'tabs', component: TabsPage, children: [ { path: 'films', children: [ { path: '', loadChildren: () => import('../films/films.module').then( m => m.FilmsPageModule) }, { path: ':id', loadChildren: () => import('../film-details/film-details.module').then( m => m.FilmDetailsPageModule) } ] }, { path: 'people', children: [ { path: '', loadChildren: () => import('../people/people.module').then( m => m.PeoplePageModule) } ] }, { path: 'planets', children: [ { path: '', loadChildren: () => import('../planets/planets.module').then( m => m.PlanetsPageModule) } ] } ] }, { path: '', redirectTo: '/tabs/films', pathMatch: 'full' } ]; @NgModule({ imports: [RouterModule.forChild(routes)], exports: [RouterModule], }) export class TabsPageRoutingModule {} |
At the top level we have our tab bar which is the the TabsPage with the view we implemented before. Inside the children array we define the different possible routes with their path, and only use the loadChildren property so the pages use lazy loading directly!
We have 3 standard routes and one with a /:id – this will be a details page where we can pass information through using the URL later.
At the end we also define a fallback redirect in case we navigate to an empty path (e.g. when your app first loads!), and the path /tabs/films means to go through the tabs page (our parent here) and then use the path films, basically the first entry of our children array!
Finally, we load all those routes into our app by using RouterModule.forChild() inside the @NgModule annotation. This means we are setting some child routes, and this is different then our first routing file which uses RouterModule.forRoot()!
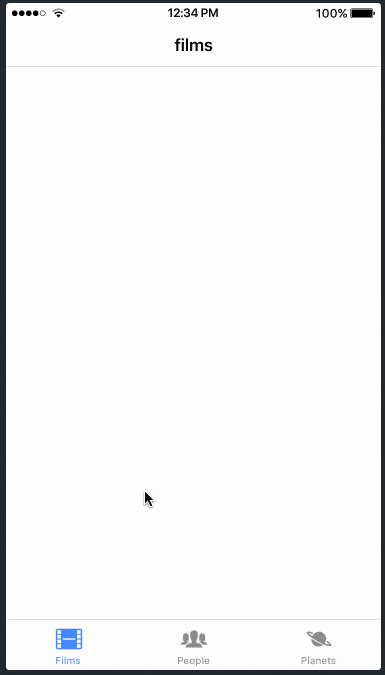
Now all 3 tabs have a page assigned, and you should see your Tab Bar view and can navigate to all 3 pages using the tabs like in the image below!
3. Change Views
We can now navigate let’s say “horizontal” but we also want to navigate “vertical” or in other words..

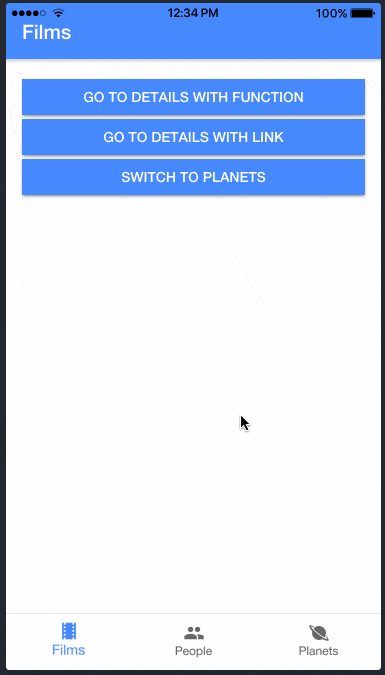
To be able to navigate to different pages we start by adding 2 buttons to the view of the FilmsPage which is the first page we see when our app starts (simply because it’s the first tab – you can of course change the previously selected tab).
We also get a first idea of the styling of Ionic apps by adding a color attribute to our top bar which will color it with the primary color (which is in general some kind of blue for Ionic).
For more information on building different UIs or routing logic inside your app there are of course many more courses for members inside the Ionic Academy!
Using the Routes & NavController
Many path lead to Rome, and there are multiple ways to navigate inside our app. We can either use a dedicated NavController which might be more common for those of you coming from Ionic 3 or we can directly use the path and URL which means using the Angular Router under the hood.
Let’s start by creating 3 buttons inside our pages/films/films.page.html
|
1 2 3 4 5 6 7 8 9 10 11 |
<ion-header> <ion-toolbar color="primary"> <ion-title>Films</ion-title> </ion-toolbar> </ion-header> <ion-content class="ion-padding"> <ion-button expand="full" (click)="openDetails()">Go to Details with function</ion-button> <ion-button expand="full" routerLink="/tabs/films/42" routerDirection="forward">Go to Details with link</ion-button> <ion-button expand="full" (click)="goToPlanets()">Switch to Planets</ion-button> </ion-content> |
By the way: You can add the color to your other pages as well so all have this nice blue top bar!
Two of those buttons simply call a function that we have to create, but the second button only has an href and a routerDirection. This means, the router will look up this path and perform a forward transition, which means we are basically pushing something on the view stack.
The route matches one of our previously defined routes and the view will be displayed, in this case the FilmDetailsPage where we have already set the ID parameter to 42 just for demonstrating how to pass values around with the routes.
Keep in mind that you have to add this information in form of :name to the routes in order to retrieve the value later!
Now let’s add the functions for the other two buttons to see how we could navigate as well, so open your pages/films/films.page.ts and change it to:
|
1 2 3 4 5 6 7 8 9 10 11 12 13 14 15 16 17 18 19 20 21 22 23 24 25 26 27 28 |
import { Component, OnInit } from '@angular/core'; import { NavController } from '@ionic/angular'; import { Router } from '@angular/router'; @Component({ selector: 'app-films', templateUrl: './films.page.html', styleUrls: ['./films.page.scss'], }) export class FilmsPage implements OnInit { constructor(private navController: NavController, private router: Router) { } ngOnInit() { } openDetails() { // Both of these would work! // But the standard Router is recommended. // this.navController.navigateForward(`/tabs/films/42`); this.router.navigateByUrl(`/tabs/films/42`); } goToPlanets() { this.navController.navigateRoot(`/tabs/planets`) } } |
In here you can now also find a constructor which gets 2 values. This is called dependency injection inside Angular apps and simply makes other classes or services available to this file using this. later on!
Our first function now shows two more ways to navigate to a details page. We can either use the NavController. navigateForward() which is the closest to the Ionic 3 push() function, but we can also directly interact with the Angular Router (that we injected through the constructor!) to navigate to the given path.
To open our third tab we can again use the correct path and simply change the name and outlet to match the route. At this point you hopefully get an idea of how the routing works!
Navigating Back
With previous Ionic versions we automatically had a back button to leave a page and return to the previous view. This is not the case with Ionic 4, therefore we have to manually add a button to our FilmDetailsPage that will be displayed when we push that page on our stack, so go ahead and change the pages/film-details/film-details.page.html to:
|
1 2 3 4 5 6 7 8 9 10 11 12 |
<ion-header> <ion-toolbar color="primary"> <ion-buttons slot="start"> <ion-back-button defaultHref="/tabs/films"></ion-back-button> </ion-buttons> <ion-title>Details</ion-title> </ion-toolbar> </ion-header> <ion-content class="ion-padding"> </ion-content> |
This is enough to include a button at the top that will bring us back to the previous page, so now we should see a nice animation between our different pages and the details page!
Passing Data Between Pages
Secretly we are already passing the value “42” to our details page all the time through the URL, but now let’s add a function to read that value. This can be done using the Angular router again and getting the value from the activated route.
To do so, we only have to change our pages/film-details/film-details.page.ts to this:
|
1 2 3 4 5 6 7 8 9 10 11 12 13 14 15 16 17 18 19 |
import { Component, OnInit } from '@angular/core'; import { ActivatedRoute } from '@angular/router'; @Component({ selector: 'app-film-details', templateUrl: './film-details.page.html', styleUrls: ['./film-details.page.scss'], }) export class FilmDetailsPage implements OnInit { filmId = null; constructor(private activatedRoute: ActivatedRoute) { } ngOnInit() { this.filmId = this.activatedRoute.snapshot.paramMap.get('id'); } } |
Now the page will always read the value from the route once it is called, and I’m pretty sure you should know how to show that value in your view, right?
If not you should go back to the first day of this course, but I trust in you.
4. Next Steps
Congratulations on finishing the 2. lesson!
I've just learned the Angular way of Routing with Ionic! Share on XEnough for today, enjoy your little project and tinker around with the current project.
In the next lesson we will make big progress towards our actual goal of using the Star Wars API!
We will learn to make HTTP calls and structure our app and data flow event better when using external resources like this, so be prepared.