Almost all newer devices currently have some sort of fingerprint our Touch ID authentication already build in. If you want to protect your app with this already built in feature you can offer users a simple and convenient way to unlock their secret data inside their app!
There different plugins we can choose, and on Android perhaps not all devices will be supported. Anyway, we take a solution that should work equally on both iOS and Android within our Ionic app which ist the Fingerprint AIO Plugin.
Setting up Fingerprint
To get started we only need a blank new Ionic app, the plugin we talked about and also another page so we can have something like a login screen before we show the actual content of our app. Go ahead and run:
|
1 2 3 4 5 |
ionic start touchLogin blank ionic cordova plugin add cordova-plugin-fingerprint-aio npm install --save @ionic-native/fingerprint-aio ionic g page home ionic g page login |
Now make sure to import the plugin to your src/app/app.module.ts like this:
|
1 2 3 4 5 6 7 8 9 10 11 12 13 14 15 16 17 18 19 20 21 22 23 24 25 26 27 28 29 |
import { BrowserModule } from '@angular/platform-browser'; import { ErrorHandler, NgModule } from '@angular/core'; import { IonicApp, IonicErrorHandler, IonicModule } from 'ionic-angular'; import { SplashScreen } from '@ionic-native/splash-screen'; import { StatusBar } from '@ionic-native/status-bar'; import { MyApp } from './app.component'; import { FingerprintAIO } from '@ionic-native/fingerprint-aio'; @NgModule({ declarations: [ MyApp ], imports: [ BrowserModule, IonicModule.forRoot(MyApp) ], bootstrap: [IonicApp], entryComponents: [ MyApp ], providers: [ StatusBar, SplashScreen, {provide: ErrorHandler, useClass: IonicErrorHandler}, FingerprintAIO ] }) export class AppModule {} |
There’s nothing else you have to take care of, we can directly start to use the fingerprint feature!
Building the Login Screen
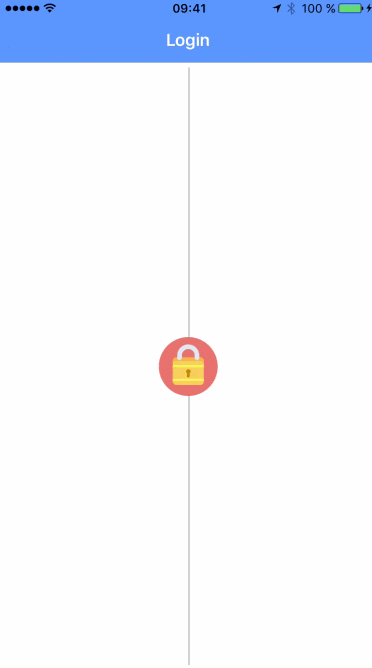
Our login screen will look a bit like when your 1Password app is locked on a device. Therefore, we not only need a button to trigger the fingerprint authentication but also a few div elements and the Ionic grid system to build a good looking login page.
Change your src/pages/login/login.html to:
|
1 2 3 4 5 6 7 8 9 10 11 12 13 14 15 16 |
<ion-header> <ion-navbar color="primary"> <ion-title>Login</ion-title> </ion-navbar> </ion-header> <ion-content> <ion-row class="login-row" align-items-center> <ion-col col-5></ion-col> <ion-col class="lock-col"> <div class="lock-bg"></div> <img src="assets/img/lock.png" class="lock-img" tappable (click)="login()"> </ion-col> <ion-col col-5></ion-col> </ion-row> </ion-content> |
Now we just need some CSS to make everything take more space on the page. Also, you might need to add your own lockscreen image to the assets/img folder of your app!
Apply these changes to your src/pages/login/login.scss so the view is finished:
|
1 2 3 4 5 6 7 8 9 10 11 12 13 14 15 16 17 18 19 20 21 22 23 |
page-login { .login-row { height: 100%; } .lock-col { height: 100%; } .lock-bg { height: 100%; width: 2px; background: #cecece; margin-left: 50%; } .lock-img { position: absolute; top: 0; bottom: 0; left: 0; right: 0; margin: auto; padding: 2px; } } |
Finally we take care of the actual functionality. As said before we don’t need any special handling for Android/iOS as this plugin will take care of talking to the right interfaces inside both environments.
The only thing we have to do is call the plugin with a few optional parameters here. The only thing needed here is clientId which gives your app an ID inside the keychain of the platform. The rest is optional, and you can check out all parameters on the page of the plugin again!
If the fingerprint authentication was successful, you can now guide your user to the next page of your app which could be something like an inside member area, so here we use setRoot() to move to a fresh navigation stack without any history.
Now go ahead and change your src/pages/login/login.ts to:
|
1 2 3 4 5 6 7 8 9 10 11 12 13 14 15 16 17 18 19 20 21 22 23 24 25 26 27 28 29 |
import { Component } from '@angular/core'; import { IonicPage, NavController, NavParams } from 'ionic-angular'; import { FingerprintAIO } from '@ionic-native/fingerprint-aio'; @IonicPage() @Component({ selector: 'page-login', templateUrl: 'login.html', }) export class LoginPage { constructor(public navCtrl: NavController, private faio: FingerprintAIO) { } login() { this.faio.show({ clientId: 'Fingerprint-Demo', clientSecret: 'password', // Only Android localizedFallbackTitle: 'Use Pin', // Only iOS localizedReason: 'Please authenticate' // Only iOS }) .then((result: any) => { this.navCtrl.setRoot('HomePage'); }) .catch((error: any) => { console.log('err: ', error); }); } } |
Finally your app is ready, and if Touch ID or Anroid fingerprint is set up on your device you can now unlock the app like in the little video below!
Of course you can also find a video version of this article below.
Does this still work? It’s my understanding that the latest iOS devices no longer have fingerprint login in deference to facial recognition.
I keep getting the error:
“Authentication error: Failed to encrypt the data with the generated key: IllegalBlockSizeException: null”
Even tho the popup says it was successful, running on Android 7.1.
If I choose the “backup” option and then use the fingerprint it does go through, but that’s not really what we want here.
its great
Perfectly working on my side (Y)
Please Help me this error
cp: copyFileSync: could not write to dest file (code=ENOENT):D:demi finger printdemoplatformsandroidresxmlconfig.xml
Parsing D:demi finger printdemoplatformsandroidresxmlconfig.xml failed
(node:12008) UnhandledPromiseRejectionWarning: Unhandled promise rejection (rejection id: 1): Error: ENOENT: no such file or directory, open ‘D:demi finger printdemoplatformsandroidresxmlconfig.xml’
[14:43:32] lint finished in 2.63 s
@ionic/cli-utils : 1.19.2
ionic (Ionic CLI) : 3.20.0
global packages:
cordova (Cordova CLI) : 8.0.0
local packages:
@ionic/app-scripts : 3.1.9
Cordova Platforms : android 7.0.0
Ionic Framework : ionic-angular 3.9.2
System:
Android SDK Tools : 25.2.5
Node : v6.10.3
npm : 3.10.10
OS : Windows 10
Environment Variables:
ANDROID_HOME : D:sdk
Got this error when build on ios xcode 9.1. =>(Pattern cannot match values of type ‘LABiometryType’) in Fingerprint.swift file of plugin. https://uploads.disquscdn.com/images/2dd33b0bccb8542d7e3707e2e71ea7c4f5cd121cb1243358867b549f15b32712.png