Facebook login with Ionic is still one of the most requested articles, and the good news for you is: It’s not that hard at all!
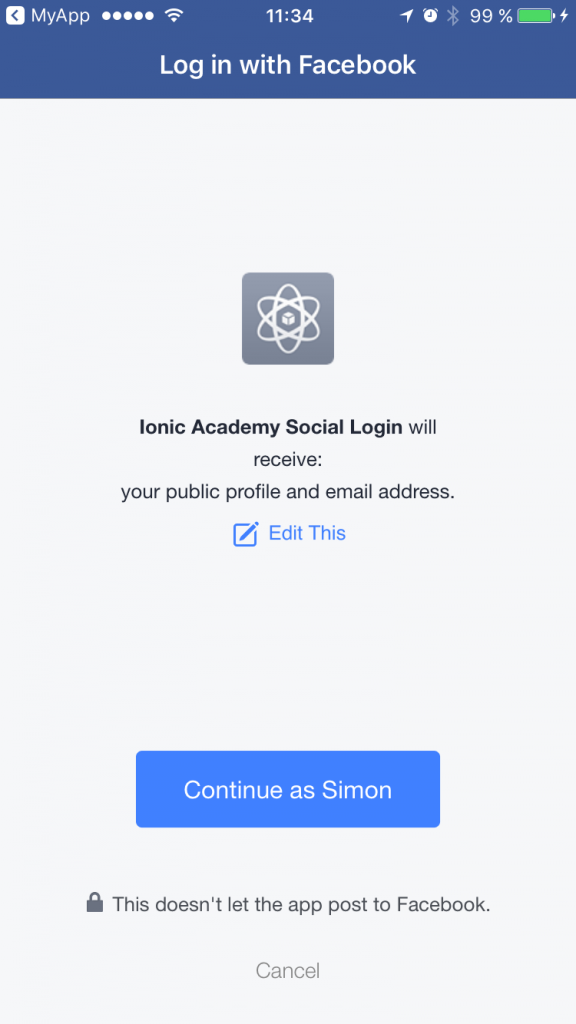
In this Quick Win we will allow our user to login with his Facebook account, and after we are authenticated we make a request to grab some user information from his Facebook profile. We will have to create a new Facebook app and connect our Ionic app to that app, but you will see it takes us only a few minutes to get a result like below.

Note: This is the iOS behaviour and seems to be standard on that platform for some reasons. On Android, your Facebook app should open directly without those additional clicks!
Setting up a Facebook App
Before we start with our Ionic app we need a Facebook app, so go to the developer page and create a new app.
Once your app is created you need to add the iOS and Android platform. Therefore, navigate to Settings and hit + Add Platform. After adding both platforms it should look like this:
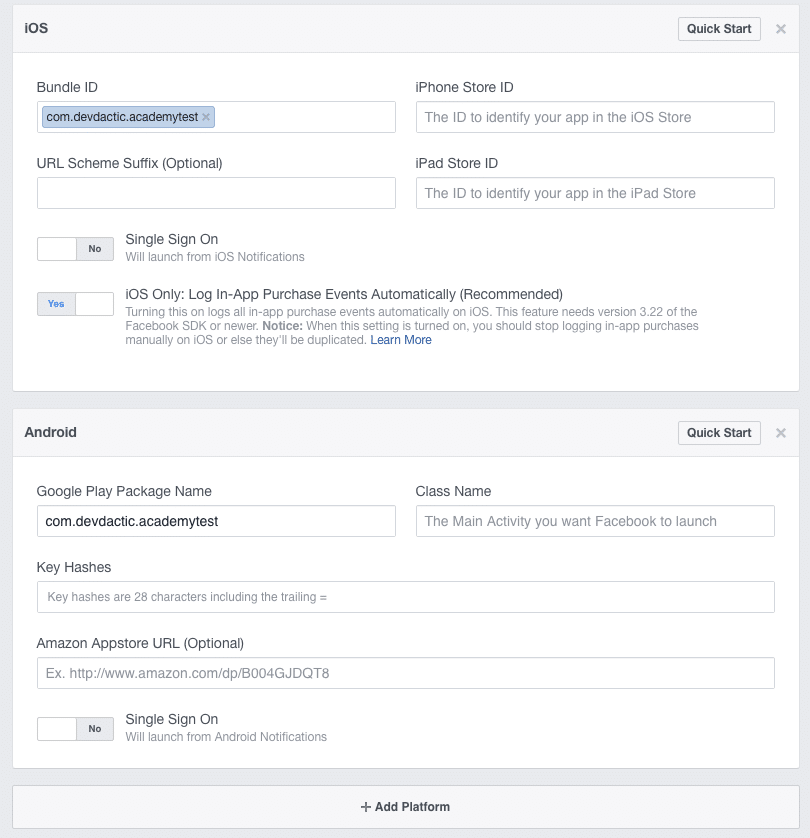
Notice that I already added an iOS Bundle ID and Android Google Play Package Name?
This is the next step for you, because your fields are still empty!
This is the same ID that our app has inside the config.xml file, so if you already have an app add the Id to those fields.
Otherwise, let’s create our app first and install the Facebook plugin from Ionic Native.
At this point you also need the App ID of your Facebook app as well as the name ecause they must be passed to the Cordova plugin as you can see in the statement:
|
1 2 3 4 |
ionic start fbLogin blank cd fbLogin ionic cordova plugin add cordova-plugin-facebook4 --variable APP_ID="YOURID" --variable APP_NAME="YOURAPPNAME" npm install --save @ionic-native/facebook |
If you started a new app like me, you still need to make sure that your config.xml id and the ids for iOS and Android inside your Facebook app are the same. In my case this looked like this:
|
1 |
<widget id="com.devdactic.academytest" version="0.0.1" xmlns="http://www.w3.org/ns/widgets" xmlns:cdv="http://cordova.apache.org/ns/1.0"> |
Your bundle id is always your reverse domain or team name, and this is also needed when you submit your iOS or ANdroid apps later.
Now we just need to make sure that our Facebook plugin is loaded by adding it to the src/app/app.moduel.ts:
|
1 2 3 4 5 6 7 8 9 10 11 12 13 14 15 16 17 18 19 20 21 22 23 24 25 26 27 28 29 30 31 32 33 |
import { BrowserModule } from '@angular/platform-browser'; import { ErrorHandler, NgModule } from '@angular/core'; import { IonicApp, IonicErrorHandler, IonicModule } from 'ionic-angular'; import { SplashScreen } from '@ionic-native/splash-screen'; import { StatusBar } from '@ionic-native/status-bar'; import { MyApp } from './app.component'; import { HomePage } from '../pages/home/home'; import { Facebook } from '@ionic-native/facebook'; @NgModule({ declarations: [ MyApp, HomePage ], imports: [ BrowserModule, IonicModule.forRoot(MyApp) ], bootstrap: [IonicApp], entryComponents: [ MyApp, HomePage ], providers: [ StatusBar, SplashScreen, {provide: ErrorHandler, useClass: IonicErrorHandler}, Facebook ] }) export class AppModule {} |
That’s all for the preparation. Actually it’s really just about creating the Facebook app, adding it with the right values to our app and adding the Platforms to the Facebook app with our id.
Simple, right?
Implementing Facebook Login
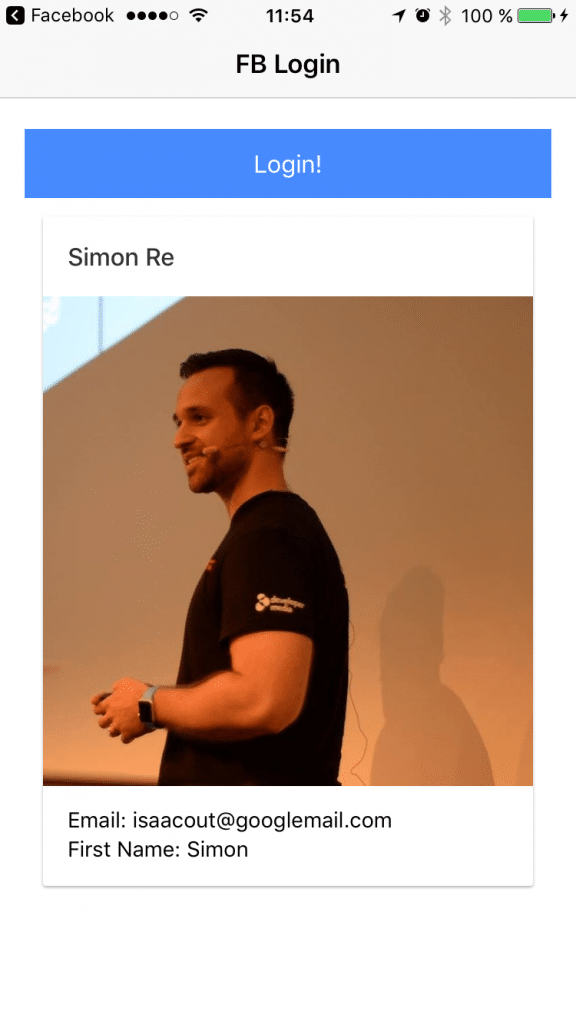
Actually the hard part is already over, now we are almost done. Inside our view we only display a button in the beginning to start our Facebook login, and once the user is logged in we display some more personal data below including the user image!
Go ahead and change your src/pages/home/home.html to:
|
1 2 3 4 5 6 7 8 9 10 11 12 13 14 15 16 17 18 19 20 21 |
<ion-header> <ion-navbar> <ion-title> FB Login </ion-title> </ion-navbar> </ion-header> <ion-content padding> <button ion-button full (click)="loginWithFB()">Login!</button> <ion-card *ngIf="userData"> <ion-card-header>{{ userData.username }}</ion-card-header> <img [src]="userData.picture" /> <ion-card-content> <p>Email: {{ userData.email }}</p> <p>First Name: {{ userData.first_name }}</p> </ion-card-content> </ion-card> </ion-content> |
As we have set up all before, the login with Facebook functionality is now only one line. Also, we can pass into this call which information from the user profile we want to access, in this case it is email and public_profile. Therefore, once we log in Facebook will ask for those permissions like in the image below.
Once we got the login token we could e.g. login to Firebase with that token, or simply continue to make requests to the Facebook API!
We try to load a few fields from the current user which is in this case “me” and set the data from the result to our local userData variable. You can test out all the Graph API fields and calls with the Facebook Graph API Explorer!
Now to the code, replace all inside your src/pages/home/home.ts with:
|
1 2 3 4 5 6 7 8 9 10 11 12 13 14 15 16 17 18 19 20 21 |
import { Facebook, FacebookLoginResponse } from '@ionic-native/facebook'; import { Component } from '@angular/core'; import { NavController } from 'ionic-angular'; @Component({ selector: 'page-home', templateUrl: 'home.html' }) export class HomePage { userData: any; constructor(private facebook: Facebook) { } loginWithFB() { this.facebook.login(['email', 'public_profile']).then((response: FacebookLoginResponse) => { this.facebook.api('me?fields=id,name,email,first_name,picture.width(720).height(720).as(picture_large)', []).then(profile => { this.userData = {email: profile['email'], first_name: profile['first_name'], picture: profile['picture_large']['data']['url'], username: profile['name']} }); }); } } |
Once your user is logged in, you should now see all of the data inside the view like in the image below of my profile!
I hope this helps you to implement Facebook login in your Ionic app, it really comes down to just a few steps and is something all modern apps have for their users!
You can find a video version of this Quick Win below.
