
Welcome to the 3. lesson of the Ionic Crash Course!
Today we will get into details on HTTP requests and how to use providers to structure our app.
We will make use of the Star Wars API, a public and free available API with JSON results which is exactly what we need right now!
1. Basic HTTP Calls
First of all we have to tell our app to include another Angular module to make HTTP requests. This is already installed, we simply need to load and add it insider our src/app/app.module.ts like this:
|
1 2 3 4 5 6 7 8 9 10 11 12 13 14 15 16 17 18 19 20 21 22 23 24 25 26 27 28 29 |
import { BrowserModule } from '@angular/platform-browser'; import { ErrorHandler, NgModule } from '@angular/core'; import { IonicApp, IonicErrorHandler, IonicModule } from 'ionic-angular'; import { SplashScreen } from '@ionic-native/splash-screen'; import { StatusBar } from '@ionic-native/status-bar'; import { MyApp } from './app.component'; import { HttpClientModule } from '@angular/common/http'; @NgModule({ declarations: [ MyApp ], imports: [ BrowserModule, HttpClientModule, IonicModule.forRoot(MyApp) ], bootstrap: [IonicApp], entryComponents: [ MyApp ], providers: [ StatusBar, SplashScreen, {provide: ErrorHandler, useClass: IonicErrorHandler} ] }) export class AppModule {} |
Now we are ready to make HTTP calls to anywhere we want!
If we want to use external resources like this, the operation is asynchronous.
Whatever you are trying to call takes time, and this happens in the background of our app and at some point returns data.
With Angular we can use Promises and Observables. If you have used AngularJS you might already know about Promises, which are called and at some point return either a result or an error.
Observables are a bit newer and allow more control, for example you can cancel an observable or receive multiple return values. You can imagine it as more like a stream of events where a promise was only one click.
So the request we make to the Swapi returns us an observable which we can assign to a local variable. We use the standard Angular Http service to make a classic GET request.
A classic promise was handled with then(), which was triggered once when the result came in.
As we now have an observable, we need to subscribe() to the stream of data that might come back! Inside that block we finally get the result of our call.
Now open your src/pages/films/films.ts and change it to:
|
1 2 3 4 5 6 7 8 9 10 11 12 13 14 15 16 17 18 19 20 21 |
import { Component } from '@angular/core'; import { IonicPage, NavController, NavParams } from 'ionic-angular'; import { Observable } from 'rxjs/Observable'; import { HttpClient } from '@angular/common/http'; @IonicPage() @Component({ selector: 'page-films', templateUrl: 'films.html', }) export class FilmsPage { films: Observable<any>; constructor(public navCtrl: NavController, public httpClient: HttpClient) { this.films = this.httpClient.get('https://swapi.co/api/films'); this.films .subscribe(data => { console.log('my data: ', data); }) } } |
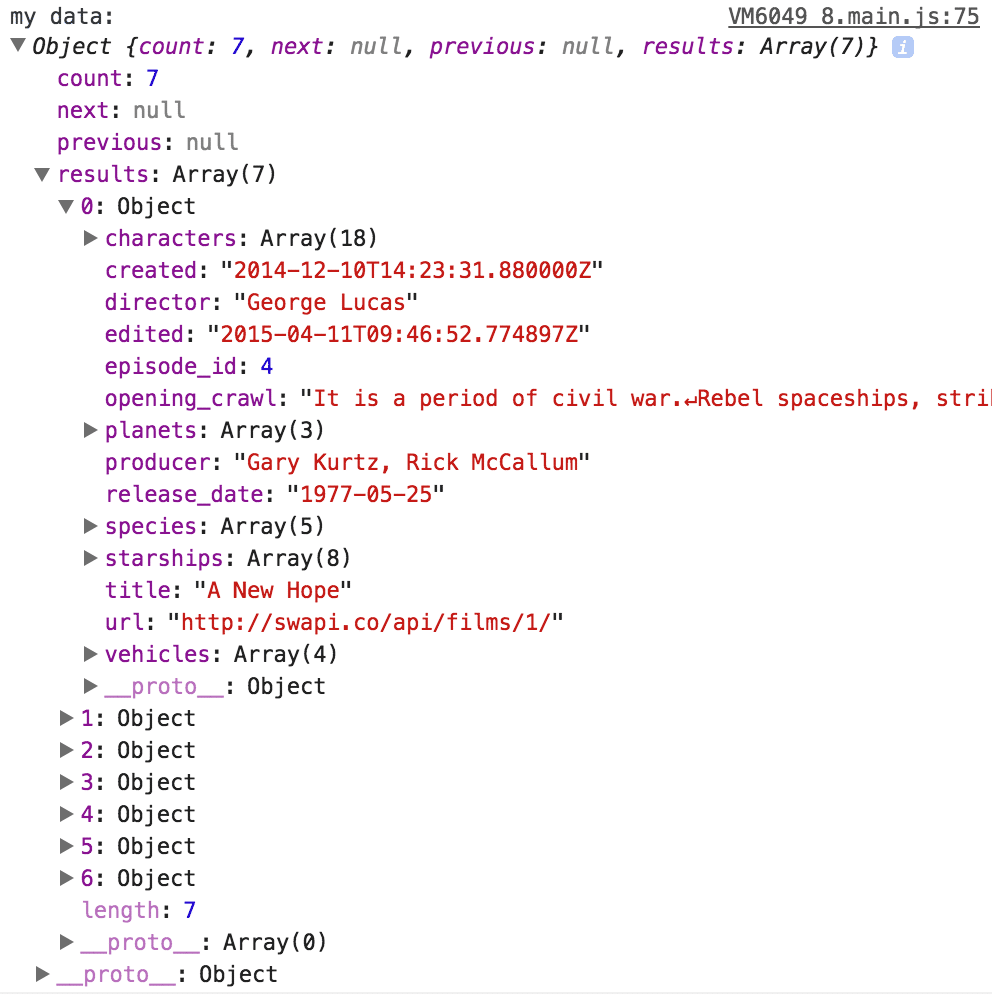
If you now open your app, it takes a short time after the start (remember: async!) and inside your debugging area you should see a log message where we can find and inspect different objects of the call we made.
NOTE: It can happen that you get a message like this inside your browser:
Failed to load http://swapi.co/api/films: Redirect from ‘http://swapi.co/api/films’ to ‘https://swapi.co/api/films’ has been blocked by CORS policy: No ‘Access-Control-Allow-Origin’ header is present on the requested resource. Origin ‘http://localhost:8100’ is therefore not allowed access.
This is an CORS issue that you will get inside the browser (but not later inside a real app!). You can simply add this Chrome extension and enable it, then the requests should also work inside your browser!
If you have come to this point you are already pretty close to displaying them, so let’s not only log but display them inside our view!
2. Displaying Asynchronous Data
With Angular we can easily use observables directly from our view. We don’t have to wait for the result and assign it then, but we can simply set the variable to the result of our HTTP call and handle the rest inside the view!
Therefore change the src/pages/films/films.ts back to a more simplified version:
|
1 2 3 4 5 6 7 8 9 10 11 12 13 14 15 16 17 18 19 20 21 |
import { Component } from '@angular/core'; import { IonicPage, NavController, NavParams } from 'ionic-angular'; import { Observable } from 'rxjs/Observable'; import { HttpClient } from '@angular/common/http'; @IonicPage() @Component({ selector: 'page-films', templateUrl: 'films.html', }) export class FilmsPage { films: Observable<any>; constructor(public navCtrl: NavController, public navParams: NavParams, private httpClient: HttpClient) { this.films = this.httpClient.get('https://swapi.co/api/films'); } openDetails(film) { this.navCtrl.push('FilmDetailsPage', {film: film}); } } |
Also, when we push the next page now we pass a film object, which will come into the openDetails() function from our view.
Inside the next code block we got a few new elements, especially:
- *ngFor: A syntax to iterate over and array and create multiple elements of the same type
- | async: Called a “Pipe”, and tells Angular to observe this variable as it will change later
- ? : Operator that tells Angular that the variable might be null, please don’t crash
The film object we create with each iteration of our loop is directly passed to the click event and will make its way to the next page.
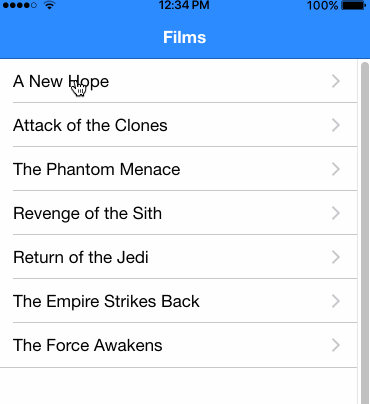
Inside the Ionic list we will create multiple items by using this loop, a very very common pattern you will see in Angular apps!
In every loop we simply add the title of the film to the button, so in the end we will have a list of buttons to open the detail page for each.
Go ahead and change your src/pages/films/films.html to:
|
1 2 3 4 5 6 7 8 9 10 11 12 13 14 |
<ion-header> <ion-navbar color="primary"> <ion-title>Films</ion-title> </ion-navbar> </ion-header> <ion-content> <ion-list> <button ion-item *ngFor="let film of (films | async)?.results" (click)="openDetails(film)"> {{ film.title }} </button> </ion-list> </ion-content> |
The last missing part now is to change the details page which is not really displaying any of our data.
We are already passing the data to that page through our push function, we only need to handle it correctly. Therefore, change the src/pages/film-details/film-details.ts to:
|
1 2 3 4 5 6 7 8 9 10 11 12 13 14 15 |
import { Component } from '@angular/core'; import { IonicPage, NavController, NavParams } from 'ionic-angular'; @IonicPage() @Component({ selector: 'page-film-details', templateUrl: 'film-details.html', }) export class FilmDetailsPage { film: any; constructor(public navCtrl: NavController, public navParams: NavParams) { this.film = this.navParams.get('film'); } } |
Just like before we are extracting the value to a local variable. Now we can use that variable inside our view to set the title and display a cool little card with the opening of the selected Star Wars movie.
Open your src/pages/film-details/film-details.html and change the view to read the values from our variable:
|
1 2 3 4 5 6 7 8 9 10 11 12 13 |
<ion-header> <ion-navbar color="primary"> <ion-title>{{ film.title }}</ion-title> </ion-navbar> </ion-header> <ion-content padding> <ion-card> <ion-card-content> {{ film.opening_crawl }} </ion-card-content> </ion-card> </ion-content> |
You can now get a list of films and display for each film the data, only with a few lines of code!
I’m always amazed when using a REST API and the data just comes in after implementing it only once for the general case. Perhaps you’re like me.
Anyway, we can improve our app structure a bit which is kind of a best practice for Ionic apps.
3. Using Providers
A provider is an Angular component that can be injected into other pages which allows us to call some functions.
A provider has no view, it’s only returning data to us. And that’s exactly what we need.
It’s a good idea to keep your HTTP calls separate from your view and class, because it can be maintained more easily and it’s not distributed across your entire project!
Creating a Provider
We can again make use of the Ionic CLI and call the generator to create a new provider for us. Simply call this from your projects root:
|
1 |
ionic g provider api |
This will create a new folder inside src/providers, and we only need to make sure the provider is added to the array of our providers for the complete app inside src/app/app.module.ts (but this might have already happened with a newer verison of the Ionic CLI!):
|
1 2 3 4 5 6 7 8 9 10 11 12 13 14 15 16 17 18 19 20 21 22 23 24 25 26 27 28 29 30 31 |
import { BrowserModule } from '@angular/platform-browser'; import { ErrorHandler, NgModule } from '@angular/core'; import { IonicApp, IonicErrorHandler, IonicModule } from 'ionic-angular'; import { SplashScreen } from '@ionic-native/splash-screen'; import { StatusBar } from '@ionic-native/status-bar'; import { MyApp } from './app.component'; import { HttpClientModule } from '@angular/common/http'; import { ApiProvider } from '../providers/api/api'; @NgModule({ declarations: [ MyApp ], imports: [ BrowserModule, IonicModule.forRoot(MyApp), HttpClientModule ], bootstrap: [IonicApp], entryComponents: [ MyApp ], providers: [ StatusBar, SplashScreen, {provide: ErrorHandler, useClass: IonicErrorHandler}, ApiProvider ] }) export class AppModule {} |
Always make sure to go through this step, otherwise you will see some errors inside your console and wonder why you can’t use your providers!
Implementing the Provider
Our provider has only a very tiny job: Return data from the Swapi!
It’s more or less the same code like we had in our page before, so go ahead and change your src/providers/api/api.ts to:
|
1 2 3 4 5 6 7 8 9 10 11 12 |
import { Injectable } from '@angular/core'; import { HttpClient } from '@angular/common/http'; @Injectable() export class ApiProvider { constructor(public http: HttpClient) { } getFilms() { return this.http.get('https://swapi.co/api/films'); } } |
Our provider has now one function getFilms() which we can call from outside, so let’s do this!
Using the Provider
Our FilmsPage is the first page to make use of our new provider.
Just like with any other stuff we used before, we need to import the file and inject it through our constructor.
By doing this, we can use it directly and call it’s functions, which will again just return an observable like before.
Open your src/pages/films/films.ts and change it to:
|
1 2 3 4 5 6 7 8 9 10 11 12 13 14 15 16 17 18 19 20 21 |
import { ApiProvider } from './../../providers/api/api'; import { Component } from '@angular/core'; import { IonicPage, NavController } from 'ionic-angular'; import { Observable } from 'rxjs/Observable'; @IonicPage() @Component({ selector: 'page-films', templateUrl: 'films.html', }) export class FilmsPage { films: Observable<any>; constructor(public navCtrl: NavController, public apiProvider: ApiProvider) { this.films = this.apiProvider.getFilms(); } openDetails(film) { this.navCtrl.push('FilmDetailsPage', {film: film}); } } |
Very easy, isn’t it?
Our app still works just like before, but we have separated our business logic from the view to a provider.
So whenever you think about the business logic of your app, try to keep them in a separate provider where you can bundle it.
Then the force will always be with you.
4. Next Steps
Congratulations on finishing the 3. lesson!
You are now already pretty skilled and able to perform HTTP requests, good job.
As a little homework for the next lesson, implement also the following changes:
- Add 2 more functions to the provider to load people and planets
- Implement the PeoplesPage and PlanetsPage with the data you get from the apiProvider
- Generate 2 more pages for peopleDetails and planetDetails like we did for our film
After doing those steps you have 3 working tabs with lists and detailed data pages!
I’m sure you can do this. If you have any questions, feel free to hit me up on @schlimmson.
Happy Coding,
Simon