
Welcome to the 7. and final lesson of the Ionic Crash Course!
We have developed our little Star Wars app over the last 6 days and never really hit a problem. But that’s not always the case 🙁
Sometimes you need to debug your app properly to find nasty bugs or just to develop new features a lot faster. Today we will see which tools we can use to find the problems faster in case something isn’t working like expected!
1. Poor Mans Logging
You might have already noticed it, you can always use this to print out your values or information which way your code went:
|
1 2 3 4 |
console.dir(film); console.log('The object is: ', film); console.warn('Custom warning'); console.error('wow that shouldn\'t happen'); |
I would call it poor mans logging, because it’s the most basic form of logging and trying to find your bugs.
There are different functions to that you can call which gives you for example a yellow warning log or red error log, so you are not only limited to the standard console.log()!
You can always find the result of these messages if your open the developer tools of your browser, so for Chrome you would press CMD + ALT + I on a Mac, on Windows it’s the same but with the windows key.
These tools are your best friend when developing Ionic apps!
A better way to get more control over your log statements with Angular would be to use a package like nxg-logger which even allows to POST your logs to an API.
By doing this you can use different log levels for your messages, so you only get the messages you really need at a time.
But debugging is not only about logging events, we can do a lot more..
2. Inspect Your Source & Elements
With the developer tools of your browser you can inspect elements of the DOM, styling and even your running source code!
Breakpoints
Breakpoints are one of the best ways to debug your app, because always printing out your values can be quite time consuming.
If you have the tools open, simply navigate to Sources and you can expand the folders of your app and find the actual code of the different pages, providers and everything you have.
From there you can set breakpoints like in the image below that will make your app stop once you hit it.
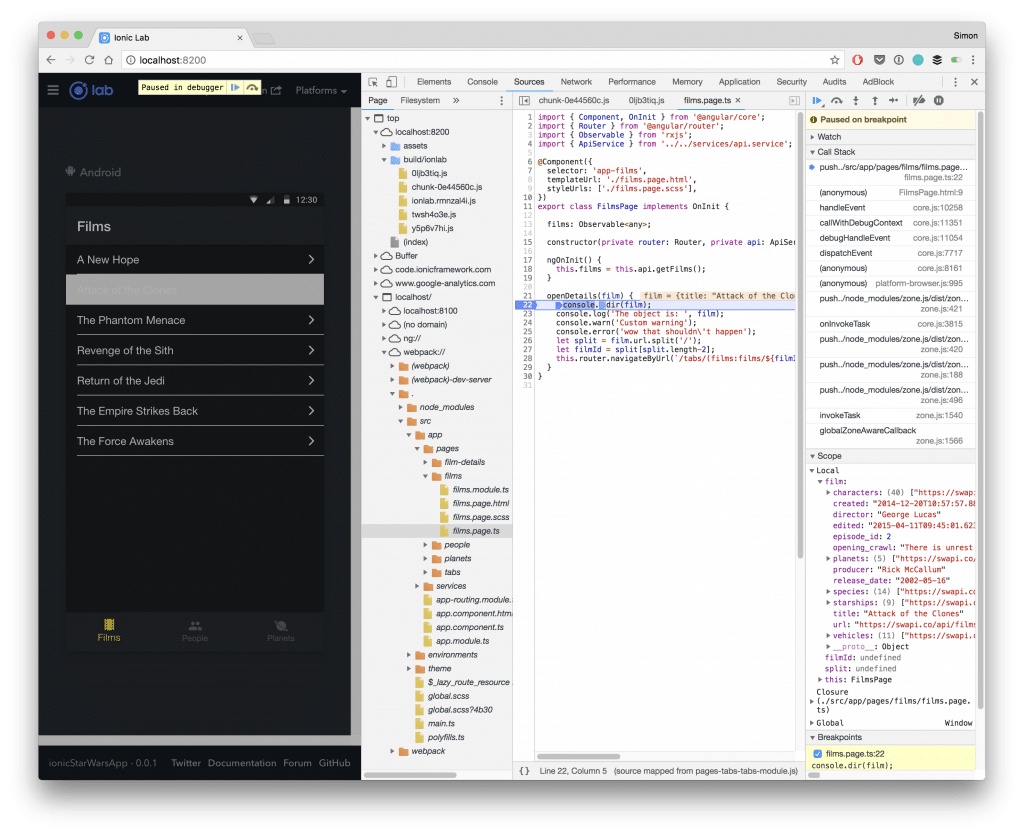
In the image you can see that our code stopped at the breakpoint just before we push the details page of a film.
On the right side we now see all kind of information, and we can easily inspect the object that was passed to the function which we then pass on to the parameters of our view transition.
If your app is giving you errors for some reasons, try to set a breakpoint before the problem occurs and step over each line or until the next breakpoint of your code to see where it breaks. I bet you’ll find your bugs 10x faster compared with putting console logs everywhere!

Elements & Styling
Another great way to debug or build the UI of your app is to inspect the elements of your current view. Doing this you can inspect the order of your DOM elements and the styling which they have, from which class it comes and which ones are overridden.
Inside your developer tools simply use the little box with a cursor inside to start the mode and then select an element from your view. You will see that already going over your items the correct one inside the HTML on the side will be highlighted.
If you select an element, the styling will be shown on the side like in the image below.
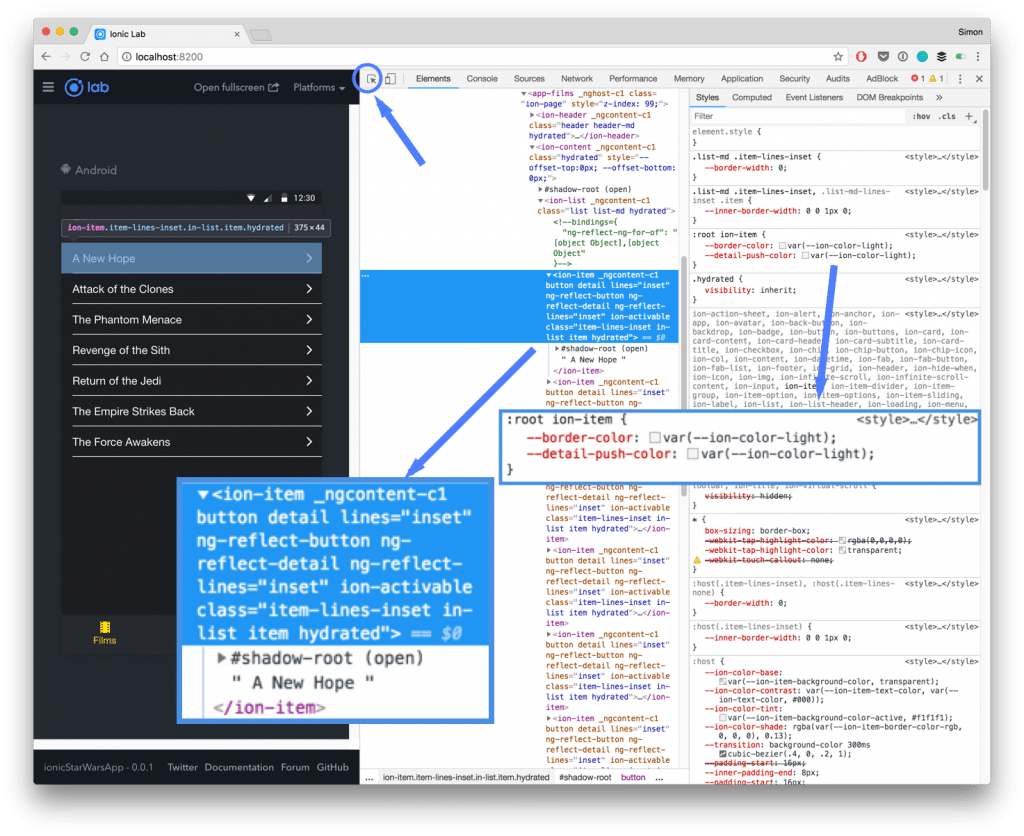
This mode is not only useful to find problems but also to work on your UI. Inside the CSS area you can directly change the CSS and apply new properties to see what’s working for you!
Shadow DOM
Since Ionic 4 you also see something new called shadow DOM. While previously all Ionic elements where basically a bunch of Div or other html tags that you could directly target with CSS, now all of them are encapsulated and hidden behind #shadow-root.
You can expand this section and see the same code inside, but this code is now living next to your DOM and has it’s own styling that you can’t override from outside using regular CSS like before.
To style these elements you need to override their CSS variables, and the good thing is inside the same view you can also see some of them on the right side.
At the time writing this there’s not yet a directory for all the names, but you can also simply start the search inside the styles area ans tart typing “–ion” which will filter all the values and show you the names of the values that you can replace!
We won’t go deeper into this new concept here, for now just understand that it’s a bit different to before, the elements are encapsulated with their styles from the regular DOM and you need CSS Variables to override their values!
3. Inspecting the Database
In the 5. lesson of this course we have used the storage engine, but do you really trust me that everything is stored?
You should because we can prove it!
If you navigate inside the developer tools to Application and on the left side of the menu drill down into IndexedDB we can find our actual storage of the app.
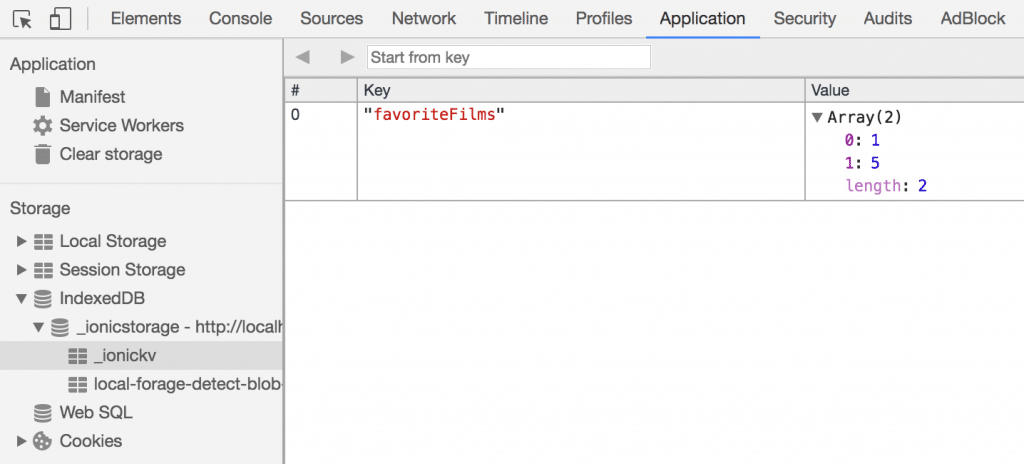
Within this area we see all of our stored data in an easy to debug format. We can even inspect the objects of our database again!
If you are running on a device and use the native storage option through Cordova it’s of course not so easy to access it, but we can still use most of our tools almost the same when our app is deployed to a device.
There’s also a course on that topic inside the library of the Ionic Academy.
4. Remote Debugging
If your app is running on the simulator or a device you can use what’s then called Remote Debugging.
As our app runs inside a webview so we can connect to it through the browser on the PC that’s connected to our device.
That’s another beauty of hybrid apps with Ionic. The debugging is really super easy sometimes!
iOS
If your app is running on an iOS we can easily connect through Safari. Simply run your app on the simulator, open Safari and from the top menu select Develop -> Simulator and select the active running view of your app.
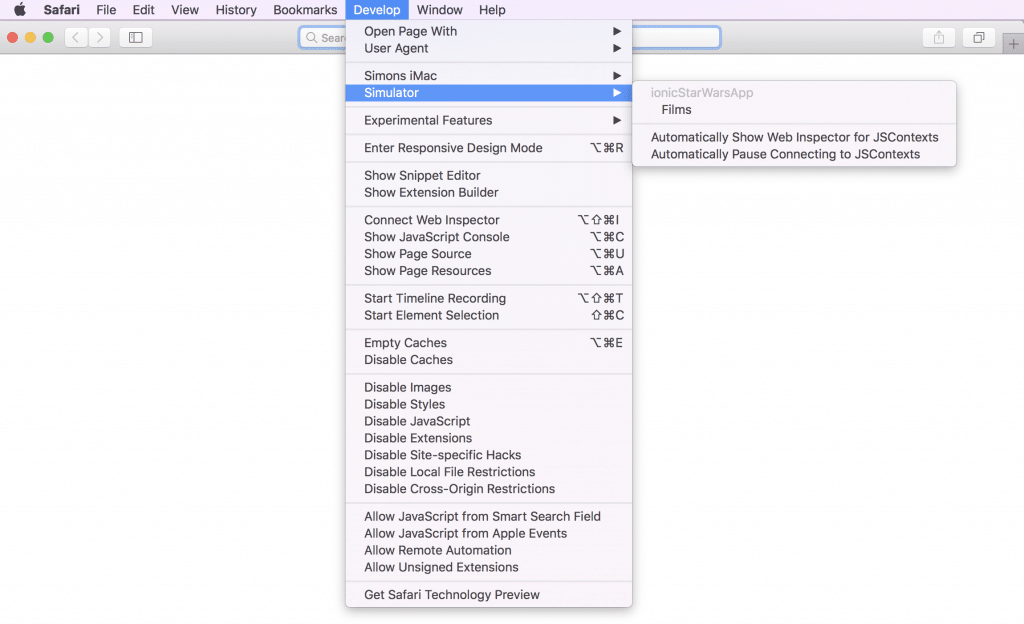
You can now use the Safari developer tools to do everything we did before, and they are pretty much the same like inside Chrome.
Android
For Android, deploy your app to your device and from your Chrome browser inside the developer tools click on the three dots -> More tools -> Remote devices.
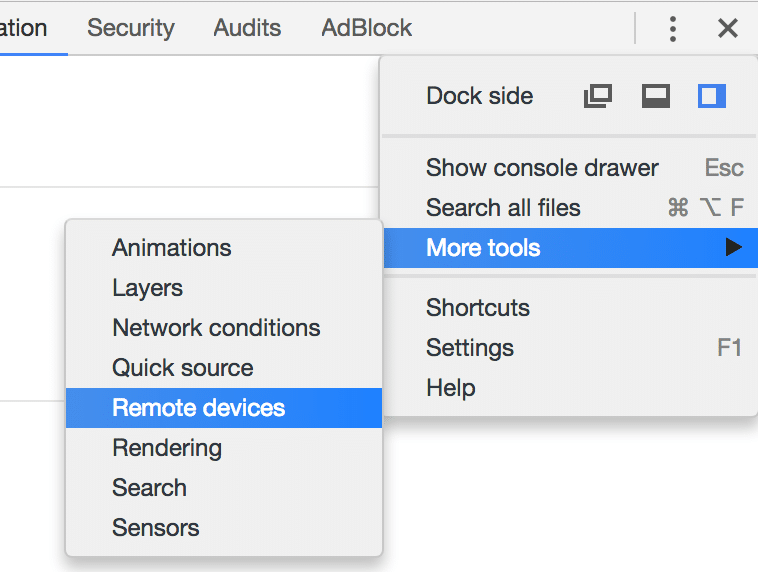
Inside that area you can find your connected devices, and just like with Safari you can inspect the webview of your remote device and do all the fun again!
I just finished the Ionic Crash Course Click To Tweet5. Recap
Congratulations on finishing the Ionic Crash Course!
If you haven’t precisely followed everything you can also download the full example app here!
You are now more skilled with Ionic than I was after a few months of learning.
You know all the basics of:
- Navigation & Routing
- HTTP calls
- Cordova Plugins & Ionic Native
- Data storage
- Styling & Theming
- Debugging
You can now start your app journey and build awesome mobile apps with web technologies!
Join the Ionic Academy
I’d love to see you inside!
Happy Coding,
Simon