Creating a PDF file that can be saved, printed or shared by your users can be a great addition inside your Ionic App. And actually it’s more easy than you might think using a few helping tools.
Inside this Quick Win we will create a PDF file using the PDFMake library, which is one of a few awesome libraries for creating PDF files. For the web, this is already enough but to get everything working inside our Ionic app we need a few more Cordova plugins so follow along to build your own PDF Creator with Ionic!
Starting our PDF App
We start with a blank new app and install two Cordova Plugins to save a File and also to open a PDF using the native viewer for PDFs. Also, we install the according Ionic Native packages plus the before mentioned PDFMake library using NPM.
|
1 2 3 4 5 6 7 8 9 |
ionic start ionicPDF blank cd ionicPDF # Install Cordova Plugins ionic cordova plugin add cordova-plugin-file-opener2 ionic cordova plugin add cordova-plugin-file #Install NPM packages npm install pdfmake @ionic-native/file-opener @ionic-native/file |
Once your installation is finished, head over to your src/app.module.ts and add our two Plugins like this:
|
1 2 3 4 5 6 7 8 9 10 11 12 13 14 15 16 17 18 19 20 21 22 23 24 25 26 27 28 29 30 31 32 33 34 |
import { BrowserModule } from '@angular/platform-browser'; import { ErrorHandler, NgModule } from '@angular/core'; import { IonicApp, IonicErrorHandler, IonicModule } from 'ionic-angular'; import { SplashScreen } from '@ionic-native/splash-screen'; import { StatusBar } from '@ionic-native/status-bar'; import { MyApp } from './app.component'; import { HomePage } from '../pages/home/home'; import { File } from '@ionic-native/file'; import { FileOpener } from '@ionic-native/file-opener'; @NgModule({ declarations: [ MyApp, HomePage ], imports: [ BrowserModule, IonicModule.forRoot(MyApp) ], bootstrap: [IonicApp], entryComponents: [ MyApp, HomePage ], providers: [ StatusBar, SplashScreen, {provide: ErrorHandler, useClass: IonicErrorHandler}, File, FileOpener ] }) export class AppModule {} |
That’s all you need to create your own beautiful PDF!
Create the View
We want to make all of this a bit more dynamic so we will add some input fields that will be displayed inside our PDF later. In our case this is very dummy like, but of course you could craft a nice form to gather all the data which can then be transformed into a PDF.
Below our inputs we add buttons to trigger the actions of creating a new PDF and also displaying (or downloading) it. Go ahead and open your src/pages/home/home.html and insert:
|
1 2 3 4 5 6 7 8 9 10 11 12 13 14 15 16 17 18 19 20 21 22 23 24 25 26 27 |
<ion-header> <ion-navbar> <ion-title> Ionic PDF </ion-title> </ion-navbar> </ion-header> <ion-content padding> <ion-item> <ion-label stacked>From</ion-label> <ion-input [(ngModel)]="letterObj.from"></ion-input> </ion-item> <ion-item> <ion-label stacked>To</ion-label> <ion-input [(ngModel)]="letterObj.to"></ion-input> </ion-item> <ion-item> <ion-label stacked>Text</ion-label> <ion-textarea [(ngModel)]="letterObj.text" rows="10"></ion-textarea> </ion-item> <button ion-button full (click)="createPdf()">Create PDF</button> <button ion-button full (click)="downloadPdf()" color="secondary" [disabled]="!pdfObj">Download PDF</button> </ion-content> |
We could also add another canvas element to display a preview of the PDF but we keep it to the basic but good looking tools.
Create PDFs, Store Files and Display the Viewer
Now the actual fun begins. Inside our class we need to craft a new element following a special syntax which can be passed to the PDF library. You can find out more on the different syntax options inside the PDFMake documentation!
There’s a lot you can do to build great PDFs and we use a few of the options to build a tiny letter with some texts and additional styling where we use the input values of our view.
Finally we need to call createPdf() with the before created definition and our PDF is more or less ready!
At this point we store the reference inside a variable to perform the download action inside a separate function. Of course you could also do all of this simply inside one functions as all of this is synchronous code.
If you want to download the file within a web browser, all we have to do is call the download() function of the library which handles the rest for us.
But if we run this code on a device this won’t work, therefore we need to store our file locally and then open it.
This process is a bit tricky but works with a few lines of code:
- Get a Buffer object of our PDF file
- Do some conversion to transform it into a Blob object
- Save the Blob using the Cordova File Plugin
- Open the saved File inside the Native File Opener using the correct path
Transforming these words into code, your src/pages/home/home.ts should now look like this:
|
1 2 3 4 5 6 7 8 9 10 11 12 13 14 15 16 17 18 19 20 21 22 23 24 25 26 27 28 29 30 31 32 33 34 35 36 37 38 39 40 41 42 43 44 45 46 47 48 49 50 51 52 53 54 55 56 57 58 59 60 61 62 63 64 65 66 67 68 69 70 71 72 73 74 75 76 77 78 79 80 81 82 83 84 85 |
import { Component } from '@angular/core'; import { NavController, Platform } from 'ionic-angular'; import pdfMake from 'pdfmake/build/pdfmake'; import pdfFonts from 'pdfmake/build/vfs_fonts'; pdfMake.vfs = pdfFonts.pdfMake.vfs; import { File } from '@ionic-native/file'; import { FileOpener } from '@ionic-native/file-opener'; @Component({ selector: 'page-home', templateUrl: 'home.html' }) export class HomePage { letterObj = { to: '', from: '', text: '' } pdfObj = null; constructor(public navCtrl: NavController, private plt: Platform, private file: File, private fileOpener: FileOpener) { } createPdf() { var docDefinition = { content: [ { text: 'REMINDER', style: 'header' }, { text: new Date().toTimeString(), alignment: 'right' }, { text: 'From', style: 'subheader' }, { text: this.letterObj.from }, { text: 'To', style: 'subheader' }, this.letterObj.to, { text: this.letterObj.text, style: 'story', margin: [0, 20, 0, 20] }, { ul: [ 'Bacon', 'Rips', 'BBQ', ] } ], styles: { header: { fontSize: 18, bold: true, }, subheader: { fontSize: 14, bold: true, margin: [0, 15, 0, 0] }, story: { italic: true, alignment: 'center', width: '50%', } } } this.pdfObj = pdfMake.createPdf(docDefinition); } downloadPdf() { if (this.plt.is('cordova')) { this.pdfObj.getBuffer((buffer) => { var blob = new Blob([buffer], { type: 'application/pdf' }); // Save the PDF to the data Directory of our App this.file.writeFile(this.file.dataDirectory, 'myletter.pdf', blob, { replace: true }).then(fileEntry => { // Open the PDf with the correct OS tools this.fileOpener.open(this.file.dataDirectory + 'myletter.pdf', 'application/pdf'); }) }); } else { // On a browser simply use download! this.pdfObj.download(); } } } |
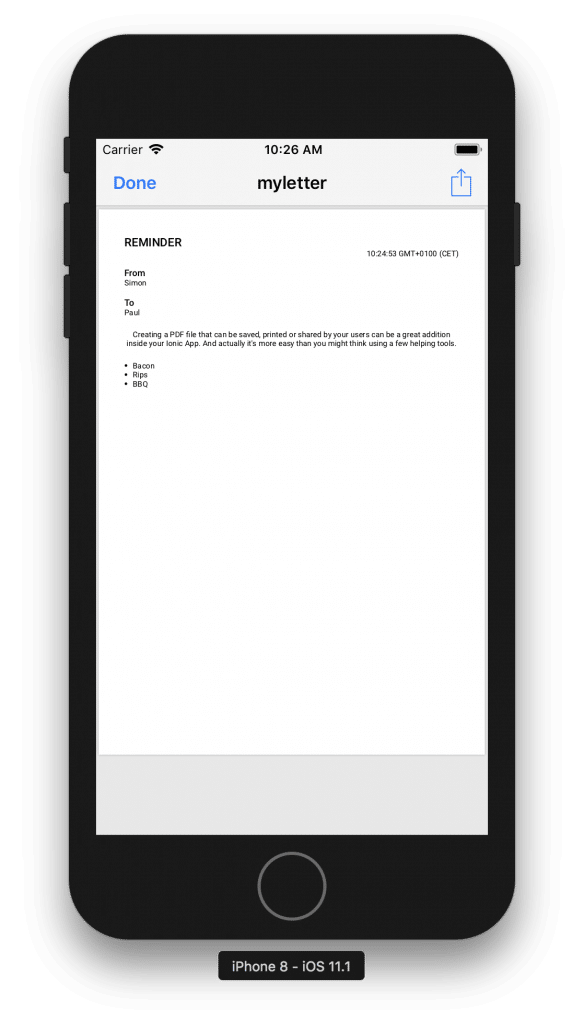
Once you hit “Create PDF” the PDF will be created and is now ready to be displayed. With the second function we can save the PDF file on our device and display it nicely like in the image below.
Note: By using the native file opener we also get the benefit of directly sharing this file using your email or anything else!
As you can see, actually it’s pretty straight forward to create your own PDF using Ionic and PDFMake. You can add tables, more styling and more dynamic data to build really helpful PDFs that can be viewed and shared by your users directly from their Ionic app!
You can also find a video version of this Quick Win below.


how to open the pdf file which is store in assets folder of app
here is my code can
show(){
const riju =
${cordova.file.applicationDirectory}www/assets/imgs/1.pdf;this.fileOpener.open(riju, ‘application/pdf’)
.then(() => console.log(‘File is opened’))
.catch(e => console.log(‘Error openening file’, e));
}
I am confused how an image can be included in the pdf.
Any hints? Lets say I want to insert an image from the assets folder.
Cheers
Yes, check this http://pdfmake.org/playground.html section Image.
how can we use Gujarati language in PDF
For me after operation show pdf file open and suddenly it closes without see any thing. Why this ? Where can find the pdf file ?
path of the pdf:
file:///data/user/0/io.ionic.starter/files/
ie. : C:datauserio.ionic.starterfiles
great work sir, does this only work on browser? because i tried implementing it on device but it is throwing an exception. please help
@ionic/cli-utils : 1.19.2
ionic (Ionic CLI) : 3.20.0
global packages:
cordova (Cordova CLI) : 8.0.0
local packages:
@ionic/app-scripts : 3.1.8
Cordova Platforms : none
Ionic Framework : ionic-angular 3.9.2
please help me
not generate pdf in mobile
The pdf file is not stored in “this.file.dataDirectory”. The file path folder remains empty, but pdf is shown in mobile and can be downloaded. I don’t know why it doesn’t save the file in the directory.
if you have error on build query the next link https://stackoverflow.com/questions/49208772/error-resource-androidattr-fontvariationsettings-not-found
is it possible to insert an image from the assets folder?
how to make pdf in thai language? it is not support https://uploads.disquscdn.com/images/f100ba1b23edb5fab276ce96919a59336fc609d6e3c2a34a39836c3347d9fef5.png
The file is created empty. Please help
The pdf is created empty
How about if you are using formBuilder
When running from safari on iOS the downloadPdf() creates nice PDF, everything is OK. But if I add the app on home screen that function gives me the blank white screen. On android devices everything is OK. Can I force app somehow to open created PDF in safari? (I dont want to build app for iOS or Android, I just want to run it as fullscreen stand alone web app)
if I want to show pdf that I have in the assets / pdf folder only?
Hi,
I have tried your solution. But it is not working. This is the error.
core.js:1350 ERROR Error: Uncaught (in promise): [object Object]
at c (polyfills.js:3)
at polyfills.js:3
at rejected (assessment-report.module.ts:13)
at t.invoke (polyfills.js:3)
at Object.onInvoke (core.js:4629)
at t.invoke (polyfills.js:3)
at r.run (polyfills.js:3)
at polyfills.js:3
at t.invokeTask (polyfills.js:3)
at Object.onInvokeTask (core.js:4620)
You can see the stackoverflow link here: https://stackoverflow.com/questions/53170314/error-uncaught-in-promise-object-object-with-ionic-native-file-plugin
My this.file.writeFile not work, can you help me ?